Prison
Prison Documentation
Prison Documents - Table of Contents
Prison - Setting Prison with Auto Configure
This document provides information on how to get started quickly using Prison’s /ranks autoConfigure.
Prison Log File Examples - Starting Prison & auto configure
Documented updated: 2023-09-09
Overview
This document covers how to run /ranks autoConfigure, it’s options, and what to do after the command runs.
It is strongly suggested to run this command and read the current help documentation for the command because a lot of changes have been happening to the commands, but these documents may be out of date:
/ranks autoConfigure help
Prison’s Auto Configure will perform most of the basic configurations to get you up and running quickly. This feature will perform the following tasks for you:
-
Create a series of Ranks and Mines that will be named A through Z, for both the mines and the linked ranks. The mines are generated as Virtual Mines.
-
Link each Mine to it’s associated Rank.
-
Assign blocks to each mine, starting with the least valuable blocks for Mine A, and then including more valuable blocks until it gets to Mine Z.
-
Auto Configure now uses a new feature called Access by Rank. This is automatically enabled for Mine Access and Access to TP for the players. Access by Rank eliminates the need to use perms for these access. As a player ranks up, they will gain access to ranks and mines, but all prior ranks and mines will automatically be included.
-
Auto assign random Mine Liners to each mine.
-
Auto generate 25 Prestige Ranks and have them enabled by default.
-
Enable Ladder Base Rank Cost Multiplier for the Prestiges ladder. Once a player prestiges, this will enable a rank cost multiplier that will increase all rank cost. As the player ranks upon the prestiges ladder, the rank costs will increase.
-
Enable Prison’s Sellall feature and preload the default shop prices with about 98 items and blocks. These defaults settings will allow your players to sell what they mine.
-
Enable Prison’s Auto Features. This includes, by default, auto pickup, auto smelt, and auto block. It also enables other features such as providing XP for certain blocks, fortune, etc.
Steps Covered in this Document
Some of the steps involved and which are covered by this document:
-
Server Requirements and expectations - Quick overview on what you need before you get started.
-
Starting Up Prison the First Time - Perform a quick sanity check that everything is working.
-
What the Auto Configure Command Does - A short list of what the command will do. See the Overview above.
-
Running the command
/ranks autoConfigure- Running the command and what to expect. -
Alternative setting to use with the Auto Configure command
-
Turning Virtual Mines in to Actual Mines - How to set the mine’s locations so they become real.
Other topics that may be helpful but not fully covered in this document:
-
Setting a Mine’s Spawn Location
-
Resizing A Mine
-
Moving A Mine
-
Changing A Mine’s Liner
-
Submitting a New Liner Request
-
Working with Mines within a Void World - Special considerations for resizing, moving, and liners when in a Void World.
-
Working with Mine’s Permissions
-
Using Mine Reset Commands
-
Working with Rank Commands
Server Requirements and expectations
These listings are to help guide you in planning on what you need. A minecraft server is a deep expression of the owner’s vision and the possibilities are unlimited. Prison provides many more options. As such, what works for one server, may not work for yours. These items provides a starting point of the endless of possibilities. Try them and see what happens.
- Spigot Platform
- You need to use a server platform that is based upon Spigot.
- Prison only supports Spigot directly, but many other platforms that are based upon Spigot have worked flawlessly too. If you use another platform based upon Spigot we will work with you if you are having issues and we will try to resolve any platform-specific issue you may encounter within reason. But we will not perform daily testing on non-spigot platforms since there are way too many variations out there.
- Minecraft Server Version
- Prison support a native minecraft server version of v1.8 through v1.18.x.
- Prison is developed and compiled with the Spigot v1.13.2 build. This ensures that Prison is able to natively support all functional behaviors from v1.8 through v1.18.x since v.1.13 is the only version of Spigot that has both the old internal functions and new internal functions coexisting at the same time.
- Prison supports the early releases of v1.18. There has been no issues found. Prison will try to support all of the new blocks within 1.18, we use a library called XSeries to provide the new blocks. So as they release their updates, prison will pickup support for more blocks.
- Memory Requirements
- Prison can run with a minimum of 1 GB of ram, but more is suggested.
- A test server running Spigot 1.8.8 with 9 plugins and 48 mines can run for hours with using less than 400 MB of ram. This is with no real activity, so I would consider this the base amount of memory.
- Normally about 2 GB to 4 GB could be required.
- It really depends upon how many plugins you have and their memory requirements. Also the number of players is a major contributing factor too. Prison does have some heavy memory requirements since many features must remain in memory while the server is running. So the more mines and ranks you have, the more memory will be required.
- Server Cores
- Most hosting services offer only 1 core, and a lot of times that single core is shared.
- Naturally prison will do well with just one core, but if your server is growing with a lot of players and you’re starting to see heavy loads, then you may want to consider increasing the number of dedicated cores your server can use. Most hosting services do not provide this as an option, but some do. So this should be something to consider if your server is growing large.
- Other Plugins - Required
- Prison has a philosophy that no other plugins are required, but the honest truth is that there are a few you really must have to get thinks to “work”. Prison has no “hard dependencies” to other plugins so that may give a false illusion that your server may not need any other plugins, which is not correct. Spigot/Bukkit will not keep prison from running if you lack critical plugins.
- Prison must have some basic support with an economy and permission plugin.
- Vault - Is a critical plugin that provides connections to numerous plugins on the market for both Economies and Permissions. Vault allows you to choose one of these other plugins and helps ensure prison will work with it. Vault allows the freedom of choice. Vault is still optional.
- Economy Plugin - Required! Prison will not work without an economy plugin. You can use almost any economy that Vault supports. Or if you don’t want to use Vault then you can use EssentialsX economy directly, or Sane Economy, or Gems Economy without Vault. Prison has direct integrations with these three economy plugins. Note that Gems Economy is a plugin that supports custom economies and can be used with other economy plugins.
- Permission Plugins - Required! Prison will not work without a permission plugin, but Spigot will default to an simple internal permission engine. But a plugin will provide more features and better support. Prison provide native support for LuckPerms v5.x and even v4.x (legacy). It is strongly suggested to use the latest version of LuckPerms. Other permission plugins are supported through Vault.
- EssentialsX - EssentialsX is a great free set of plugins that provides a good free economy plugin and also they have a great chat plugin that will provide a simple and reliable way to set chat prefixes.
- Placeholders - Placeholders support is optional, but it provides for a richer server environment by integrating prison details within other plugins such as holographic displays, scoreboards, and chat prefixes. Prison supports PlaceholderAPI (papi) and strongly recommends its use. Prison also supports MVdWPlaceholderAPI but it may not be as flexible as papi, also it may fail to work with prison’s placeholder attributes.
- WorldEdit and WorldGuard - WorldGuard is strongly suggested to protect your whole world. With prison’s newest release, the use of Mine Access Permissions reduces the need to create WG regions other than the default region. WG is also useful for keeping players out of areas such as mines they don’t have access to.
- Other Plugins - Optional
- ProtocolLib - Used by other plugins. You probably will need it.
- Holographic Displays - Creates holographs. You will also need HolographicExtensions plugin to get the holographic displays to work with PlaceholderAPI (papi).
- An Enchantment plugin - Provides OP options for your OP mines - TokenEnchant is recommended for the fullest support within prison, but it is a premium plugin. Other options are Crazy Enchantments and Zenchantments. There are others, but they may not be fully supported due to conflicts with the bukkit BlockBreakEvents and they don’t have explosion events that prison can monitor and enable.
- McMMO - Prison supports it within the mines. Appears to be fully supported.
- MinePacks - Prison has it’s own built in backpacks, but this is another backpack plugin that’s supported.
- Custom Items - This is simply an amazing plugin. You can create custom items, but also custom blocks with custom textures (optional) and custom events. Prison supports about 90% of the features; if you need more feature enabled for it, please contact us.
- Multiverse-core - Supports multiverse-core and the delayed loading of worlds. Also supports Void world generators.
- ViaVersion and ViaBackwards - Allows for the support of versions other than your server version. Not all features may work when using this plugin, but no issues have been reported.
- Access to the Server’s Console
- Some hosting services may not offer access to the server’s console, but the console can make it easier to enter complex commands and to view larger sets of data from various command outputs.
Starting Up Prison the First Time
Prison prints out a lot of detailed information when it starts up. Please review the console to confirm there are no obvious error messages. If there was an issue with prison, and prison is able to detect any issues upon startup, then they will be listed there.
If at any time it appears like there may be something wrong with prison, then please check these startup messages for it may give you a clue as to what is going on.
If at any time you need help with prison, then the first few lines and the list of plugins, with their versions, usually are able to provide a lot of details as to what may be going on.
What the Auto Configure Command Does
Please see the short section at the top of this document titled: Overview.
Running the command /ranks autoConfigure
It is strongly suggested to run this command from the console so it will be easier to see the messages and any notifications it may provide.
The current version of Prison’s /ranks autoConfigure uses Access by Ranks to allow players to use various parts of prison automatically. Two of the major components that are using Access by Rank are /mines tp and player access to the mines. These accesses are based upon the default rank. A player, through Access by Ranks, has access to all prior ranks too. This new feature of using Rank Associations will only work for mines that are linked to ranks.
The use of Access by Ranks prevents the need for /ranks autoConfigure to generate any rank commands dealing with permissions. You may need to add them for your own needs.
Critical: It should be noted that the ideal conditions to running this command is without having any mines or ranks previously defined. If any are detected, this command will terminate and will not attempt to perform any actions. You can use the Option force to force the auto configure to run if there are ranks and mines already defined. If you do force it, keep in mind that it will skip over any rank or mine that it would otherwise try to generate. It will not add blocks to existing mines. It will not hook up ranks to mines. Nor will it configure such features as Mine Access Permissions. If you decide to use force you do so at your own risks. That said, it’s easy to delete the plugins/Prison/ directory and start over (or just rename it).
Almost every command within prison has detailed help, and it can be activated by adding the help keyword to the end of the command. For example:
/ranks autoConfigure help

Under most circumstances you will not have to choose any options.
Then run the command. It should only take about 5 seconds run and will generate a lot of output.
/ranks autoConfigure
Sample Output from the running the Auto Configure
The server that was created to run this example was using 9 core plugins:
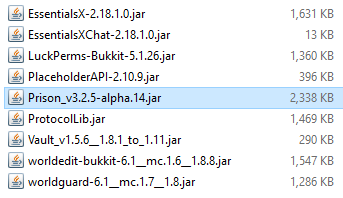
The generated log files can now be found in this document:
Prison Log File Examples - Starting Prison & auto configure
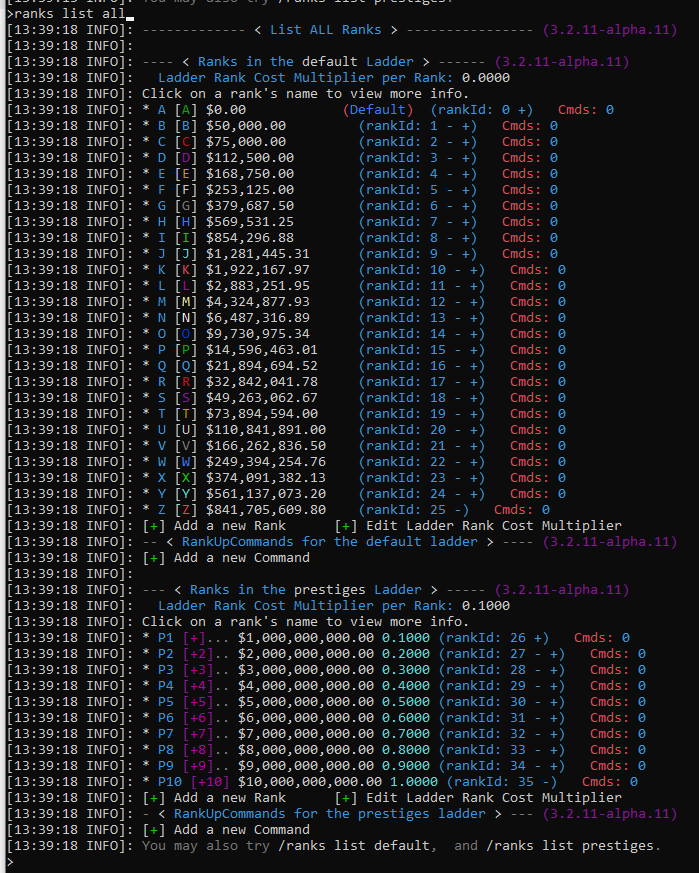
Listing the generated ranks on all ladders using the all keyword:
/ranks list all
Listing the information on Rank A, including the ladder and rank commands.:
/ranks info a all
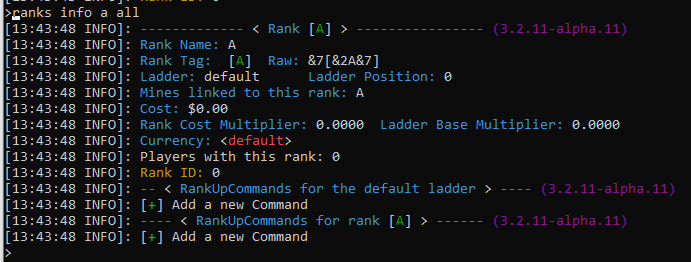
Using the keyword all is the same as also running the command: /ranks command list a
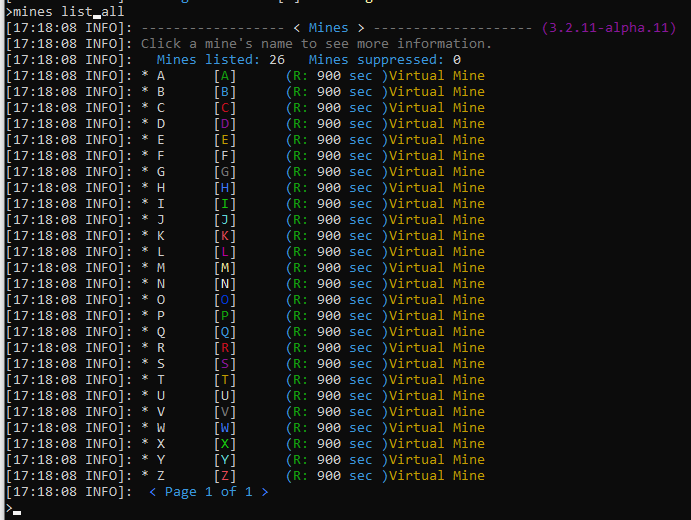
Listing the generated mines:
/mines list all
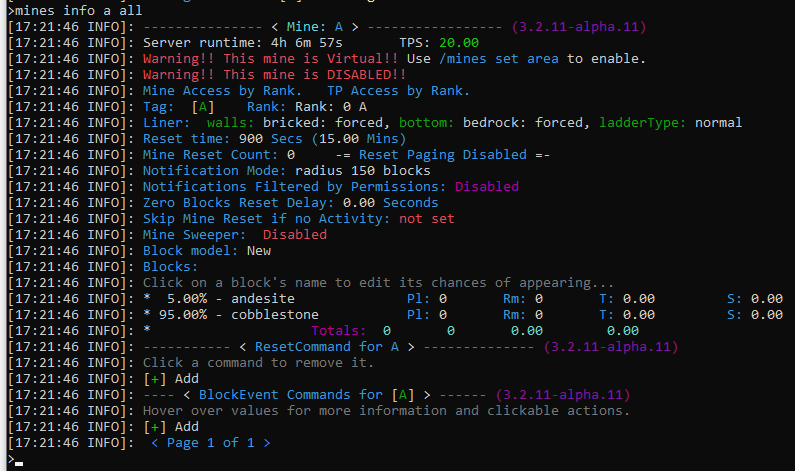
Review the details of Mine A, including the block listing:
/mines info A all
Alternative setting to use with the Auto Configure command
Generally you would never need to use any of the options. But they do provide for some control during auto configure process.
-
Default values - [
full price=50000 mult=1.5] -
Full - The default for options. This will perform a full auto configure. See the section at the top of the document titled Overview for a list of features and actions performed. Future releases of prison will probably expand upon these.
-
price=x - The default value for price is 50,000. This set’s the price for the first rank.
-
mult=x - The default value for the multiplier is 1.5. This is the multiplier that is used calculate the next rank. So if the first rank has an initial cost of 50,000 then the second rank cost is 1.5 times that value. Therefore the second rank will have a cost of 75,000 (50,000 * 1.5).
-
Force - If any mines or ranks exist, normally it will prevent auto configure from running. Force forces it to run, but with consequences. Auto configure will try to merge any preexisting ranks and mines, but it will also replace all blocks in all mines. There maybe some unexpected consequences to forcing an auto configure, so back up your data. If you decide to use force you do so at your own risks.
-
forceKeepBlocks - If forcing auto configure to run again, the ‘forceKeepBlocks’ will prevent existing mines from having their blocks reset to the defaults.
-
ranks - If specified, it will only generate ranks and not the mines or prestigies.
-
mines - If specified, it will only generate mines and not the ranks or prestiges.
-
prestiges - If specified, it will only generate prestiges and not the mines or ranks.
-
prestiges=x - Will set how many initial prestige ranks to create.
-
prestigeCost=x - Sets the initial cost for P1; default value is 1_000_000_000.
-
prestigeMult=x - Is an additional multiplier for presetige ranks, with the default value of 1. The cost for each prestige rank is based upon the initial presetigeCost, times the prestige level so p3 will be 3 times the cost of p1 with the prestige multiplier will multiplied against that value. So for default values with a 1.75 multiplier p3 cost = 1_000_000_000 * 3 * 1.75. Default values [full price=50000 mult=1.5 prestiges=25 presetigeCost=1000000000 prestigeMult=1]
-
NOTE: Use of these parameters, you can adjust some of the settings on your server, without replacing preexisting configurations.
Other commands of interest:
-
`/ranks ladder rankCostMultiplier help’ - Is used to calculate a player’s rank cost when they rankup. This is a multiplier based up a ladder, where the ladder’s multiplier is multiplied by that ladder’s position. So if a prestige ladder uses a rank cost multiplier of 0.1 (10 percent), then when a player is at P0 (no presetige rank) it will not increase the costs of the default ranks prices. But when they are at P1, then it will be a 10% increase, and at p10 it will be at a 100% increase (twice as expensive than p0). A ladder could be set to zero so it does not contribute to the player’s total calculated rank cost multipliers.
-
`/ranks ladder applyRankCostMultiplier help’ - This is a ladder setting where if a ladder applies the player’s rank cost multiplier then it’s rankup costs on it’s ladder will apply the rank cost multiplier. If the ladder is disabled, then it will use the raw rank cost. Note a ladder can be disabled, but yet still contribute to the players total rank cost multiplier.
-
`/ranks ladder resetRankCosts help’ - This resets all rank costs on a ladder based upon a uniform formula. This is good to use after adding new ranks, and you want each rank to be progressivly more expensive, at a uniform rate.
- ‘/sellall multiplier addLadder help’ - Adds one multiplier per rank for a given ladder. You can control how the multiplier is generated per rank.
- ‘/sellall multiplier deleteLadder help’ - Deletes all multipliers for a given ladder. This is very useful when adding adding new multipliers by ladder.
- ‘/sellall multiplier list help’ - can limit the list of multipliers by ladder and can control how many columns are in the display.
Turning Virtual Mines in to Actual Mines
One of the first things that you probably should do first, is to protect your new world. The following are a few commands that will prevent players from breaking blocks outside of the mines, and then the next two will prevent mobs from spawning (optional).
/rg flag -w <world> __global__ passthrough deny

/region flag -w <world> __global__ mob-spawning deny
/gamerule doMobSpawning false
To convert the virtual mines you need to define mine’s area. There are two primary ways of doing this:
Use your feet - seriously ;)
- Stand where you want the mine. Or if it is a void world, fly to the position.
/mines set area <mineName> feet 20 7- This will initially create a 1x1x1 mine located at your feet along with the liner.
- The keyword
feetidentifies that the coordinates for the location of the mine is based upon your feet location. - The first number, 20, is used to expand the walls by 20 blocks in all directions. The result will be a mine with a width of 41 and a depth of 41 blocks.
- The second number, 7, indicates the increase of the bottom of the mine. The result will be a mine with a depth of 8 blocks (1 block for the initial size, plus 8 more).
This one command actually runs the next two commands automatically:
/mines set size <mineName> wall 20/mines set size <mineName> bottom 7- The command
/mines set size helpincreases or decreases a mine’s size in the specified direction, for the specified side. -
If a void world, you may need to
forcethe liner. Now would also be a good time to change it if you wish. /mines set liner ?- Will show all available edges and patterns.
- Available Edges: [top bottom north east south west walls]
- Available Patterns for spigot 1.8.8: [bright white blackAndWhite seaEchos obby bedrock glowstone glowingPlanks darkOakPrismarine beacon bricked darkForest theColors repair remove removeAll]
/mines set liner <mineName> walls bright force/mines set liner <mineName> bottom seaEchos force
Note: You can also set the ladder widths. Please use the ‘help’ keyword for more information.
The other method is a little more controlled, and that’s using prison wand to select the two opposite corners, which means you need to have a block to click on. If they don’t exist, then you will need to add them.
/mines wand- The right click on a block using the wand, then left click on another block using the wand to define the area of the mine.
/mines set area <mineName>- You can also resize the mine as in the prior example, and even set or change the liner too.
A Quick Overview of the ‘help’ Keyword
Prison has an advanced command handler that is able to do a lot of things. One of it’s features is to provide more information on each command that it has registered. To activate this feature, just add the keyword help to the end of any command. Here are a few examples.
/ranks autoconfigure help
/mines info help
/ranks promote help
/ranks command add help
/prison support submit
/prison utils potionEffect help
The help keyword can be used on sub-command listings, which will display the list of commands at that level. The help keyword is applied automatically for sub-commands and is what actually triggers the command listings.
Setting a Mine’s Spawn Location
Stand where you want the mine’s spawn to be, looking in the direction you want them to be facing. Then issue this command:
/mines set spawn <mineName>
If you do not set a spawn location, then players will be teleported to the top-center of the mine. If there is air under their feet, then it will spawn a glass block for them to stand upon to prevent fall damage. If the mine has been significantly mined and there are no blocks around that area, then may fall to their death if they leave that glass block.
Resizing A Mine
Moving A Mine
Changing A Mine’s Liner
Working with Mines within a Void World
Special considerations for resizing, moving, and liners when in a Void World.