Prison
Prison Documentation
Prison Documents - Table of Contents
Prison - Setting Up Mines
This document provides some highlights to how to setup mines. It is a work in progress so check back for more information.
Documented updated: 2024-12-14
Overview
This document should be able to provide the basic information to get your mines configured. There are many options available within Prison, and also through the use of other plugins, so advanced topics that blend multiple plugins, and their various settings, are beyond the scope of this document.
As a side note, if you installed prison, and it appears like it may not be working in a specific world, please see the config.yml file to see if prison’s command handler is disabled within that world. If it is, then all prison commands will be turned off in that world, and there will be no way to bypass it unless the config.yml file is changed.
Prison has a list of suggested plugins that works well with Prison, and a few that do not work at all with Prison. Please see the following document for a list of suggested plugins. If you have a favorite plugin that works well with Prison and it’s not in that list, then please reach out to us in our discord server and make a suggestion for it to be added. Setting up Prison - The Basics
New Command:
/mines block layerStats help
This new command will provide a layer by layer inspection of what blocks were assigned to a mine, versus what is actually in the mine currently. This is useful when confirming block constraints are working correctly, or if another block was not spawning as expected, such that there is too much AIR.
Items to add to this document:
- Use of */mines backup help this command will make an individual backup of a mine’s config settings on the server’s file system. This backup can manually be used to rollback any changes to a mine. Prison has a command /prison support backup help that will make a backup of all files within the server directory plugins/Prison/, of which it will include all mine backup files, then remove them from file system. Contact support on our discord server for help.
- Use of /mines set area to change the mine size without deleting it.
- Use of /mines delete how it works and how to recover a deleted mine.
- Use of /mines list
- Use of /mines reset provide a little information about how it works in relationship to the other settings and commands. There are some internal things that happen and this will help clarify how the other settings are impacted.
New! Prison Fast Start
Prison now has a new set of features that can help you get up and running faster than ever! /ranks autoConfigure. It can auto create your ranks and virtual mines, A through Z, it will link the mines to the ranks, setup the basic rank commands to provide basic access permissions for your players, and assign blocks of increasing values to all mines. This command also enables the Mine Access Permission so it will be easier to control player’s access to mining.
The Prison auto configure enables prison’s sellall features and preloads about 98 default items to make it easier to get started with your sellall shop. It also enable the most popular auto features and links the generated mines to the generated ranks to simplify enabling access for the players.
The auto configure will generate both ranks and mines with the names A through Z, and will link the ranks to the mines of the same names. Prison will setup all the generated mines as virtual mines, which includes the basic configurations that are most commonly used, plus it assigns blocks to each mine, in an increasing range of values. The accessMinesByRanks will also be enabled, which will help bypass the need to generate a WorldGuard region for players to have access to the mines, and will help reduce the need to configure so many perms since Prison will handle the complex relationships for you.
If you are trying to use Prison with another plugin, such as an enchantment plugin, then you may need to create WG regions because the other plugins would require them.
Once the the auto configure command is completed, all you need to do is to use the command /mines set area on all mines to make them physical mines. Plus there are a new features to help provide the finishing touches in almost no time, such as setting liners for your mines.
The Prison auto configure is very powerful and allows you get up and running much faster, but it does not prevent you from customizing any aspect that you would desire. We strongly encourage everyone to at least start off with the auto configure, play around with it to see what prison can do with these simple setups, then it can help give you an idea of other customizations. It should be noted that auto configure only uses about 10% of the features available within Prison, so as useful as it may be in showing you how to get up and running quickly, there are many other possibilities available where your imagination may be the limiting factor on how your server can be customized to your desires.
Some of the commands of interest:
/ranks autoConfigure help/mines set area help/mines set tracer help/mines set size help/mines set liner help
Keep in mind that in order to use the command /ranks autoConfigure you should not have any mines or ranks defined yet, which may cause some conflicts with mines and their ranks. So before you create a test mine, go ahead and run the auto configure so at least that is complete. There is an option to force the generation of auto configure, but when forcing the generation, it will skip over any rank and any mine that is already configured, so it could cause a mess.
One thing you need to keep in mind, if you are using something like LuckPerm groups, you must define the groups within LuckPerms before you can actually use them, such as through a rankup command being ran.
Getting Started
Please review the Prison’s Table of Contents for information on how to configure your server, and which plugins are required, or at least suggested.
Prison now uses mineAccessByRank which eliminates the need to setup WorldGuard regions, unless you are using other plugins that require them. If you have a need to setup regions that will work with prison, then it is strongly suggested that you review the documentation on Configuring and Using WorldGuard with LuckPerms to Protect Mines since that explains a lot on how to setup the basics with your world, which will not be covered here. There will be references to this document, but this will be the only link provided.
These instructions assume you are OP’d since that is part of the above document pertaining to WorldGuard. If not, go ahead and OP yourself.
To follow along with this documentation, you may want to crate your first mine as a test, with intentions of deleting it later. It may be easier to remove it, than to convert it over to a final product. The instructions here are informational, not focused on perfection. So after you figure out how to create your mines, you may want to provide more attention to the details to ensure they are perfect. But for now, the focus is on the commands and better understanding what is possible.
Please note that all command provide in this document will be written as if they were entered within the game and will require the leading slash: /. If you use these commands within the console, then do not include the slash prefix. I always include the slash prefix in the documentation so the commands stand out as being commands. Personally, I actually prefer to use most commands in the console since there is more room to view the details.
It should also be strongly noted that you should never manually modify the save files for the mines, ranks, or ladders, since that could easily lead to corruption and undefined failures and problems. We cannot support misuse of the files. The primary reason for this concern is that Prison has a rich command interface that provides many checks and balances to ensure the commands are setup correctly. When prison starts up and the configuration files are loaded, those same validations are not performed so serious conflict could be caused by hand modification. That said, if you do adjust the commands by hand, keep in mind these file format of these save files are either yaml or json and therefore if your changes results in invalid yaml or json, then they will not be able to be loaded. We do not support hand edited config issues, but if we have time, we can possibly help identify where the errors are. Keep in mind that if you are having issues, copy and paste the config file that is having issues in to an online lint application: https://jsonlint.com/ or https://codebeautify.org/yaml-validator. There are many to choose from, and they usually help point out where the issue are and provide suggestions on how to fix the errors.
Create Your First Mine
Being OP’d, find a good location for your mines.
Also the following commands may help setup the environment. Optional of course. Having some block in your inventory can be useful for use as scaffolding or selecting. I personally like to use sealanterns because they are not a common block and they stand out well in low light conditions and are easier to see in screen prints. Giving yourself /fly and /god may not be necessary, but it could help if you need to find a good location, or if there are mobs in the area when you drop out of creative mode and back in to survival.
A few useful commands as OP:
/op <yourIGN>
/fly
/god
/gamemode creative
/time day
/give <yourIGN> sealantern 64
Command: /ranks autoConfigure
If you ran the command /ranks autoConfigure then all of your mines have been generated and are virtual mines. A virtual mine is one that is fully configured, but it has not been “physically” placed in any world yet. So you can tweak the configurations on the mine, except for setting that relate to any locations within a world. All you have to do with these virtual mines, is to place them.
Below are some of the settings for creating a mine, but since they are already created, you can skip over some of these settings and just jump to placing the mines.
The wand
Now give yourself a Prison wand.
/mines wand
A mine wand will allow you to set the coordinates of a mine by clicking on a block. You cannot click in air, so you may have to place a block to define the coordinates.
A mine wand can also be used for debugging block break actions within a mine. If you are having issues with getting mines to work, it’s one of the many built-in support tools that can help figure out what’s going wrong, since a prison server can become very complex, especially when factoring in other plugins. Please contact us through our discord server for additional help if needed.
Note: You can now test block breakage with the command /mines debugBlockBreak while holding the tools of your choice. This may be a better way to test enchantment plugins, which will probably ignore a plain diamond pickaxe that is used by default with the mine wand.
Laying Out the New Mine
For the sake of this document, and to keep things simple, the mines we are creating in these examples and screen prints will be very small and will not be deep within the ground. This will allow for easier understanding of the general layout of what is being created.
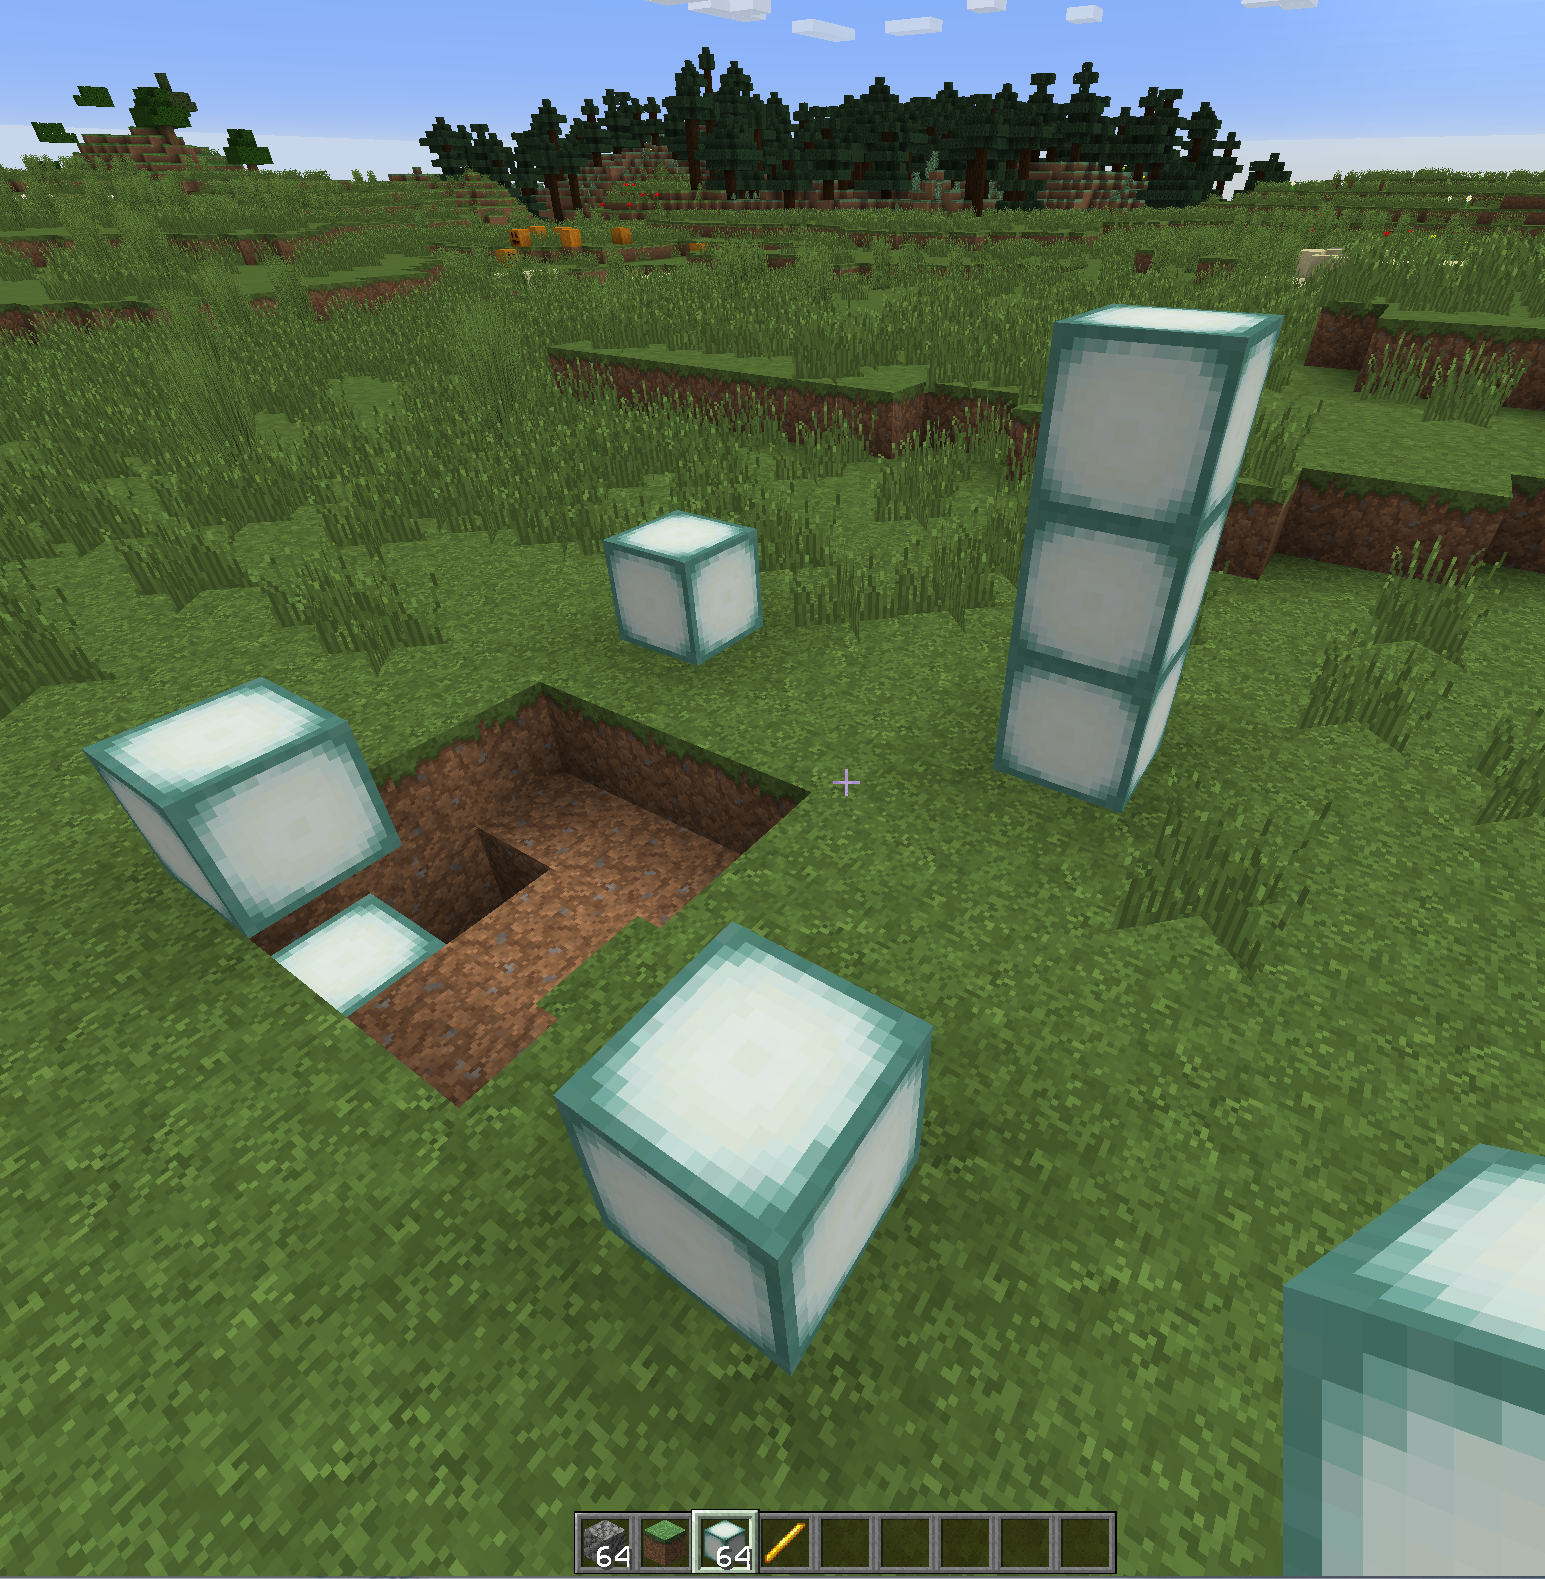
First mark out the dimensions of your mine. As you can see here, I’ve marked my first mine out with sealanterns to show you how big it will be. You really only need to mark opposing corners since that defines a cuboidal region. I’ve cleared away some of the dirt so you can see the lower blocks. This mine will be 5 x 5 x 5 in size.
Define the New Mine
Then holding the Prison’s wand (blaze rod), left-click in one corner, and then right-click in the opposite corner. In this example, I’ve left-clicked the lowest sealantern block, then right-clicked the highest sealantern block. You should see a message indicating that you have successfully selected a region.

Then create the mine with:
/mines create test1
NOTE: the command /mines create help is intended for creating new mines. If you ran /rank autoConfigure then the mines already exist, and instead of using /mines create you just need to “set” or place the mines with /mines set area help.
It will default to 100% air. So then follow up creating the new mine with a reset to confirm everything is replaced with air. Mines that are precreated with /ranks autoConfigure already have assigned blocks.
Reset the New Mine to Test if it Exists
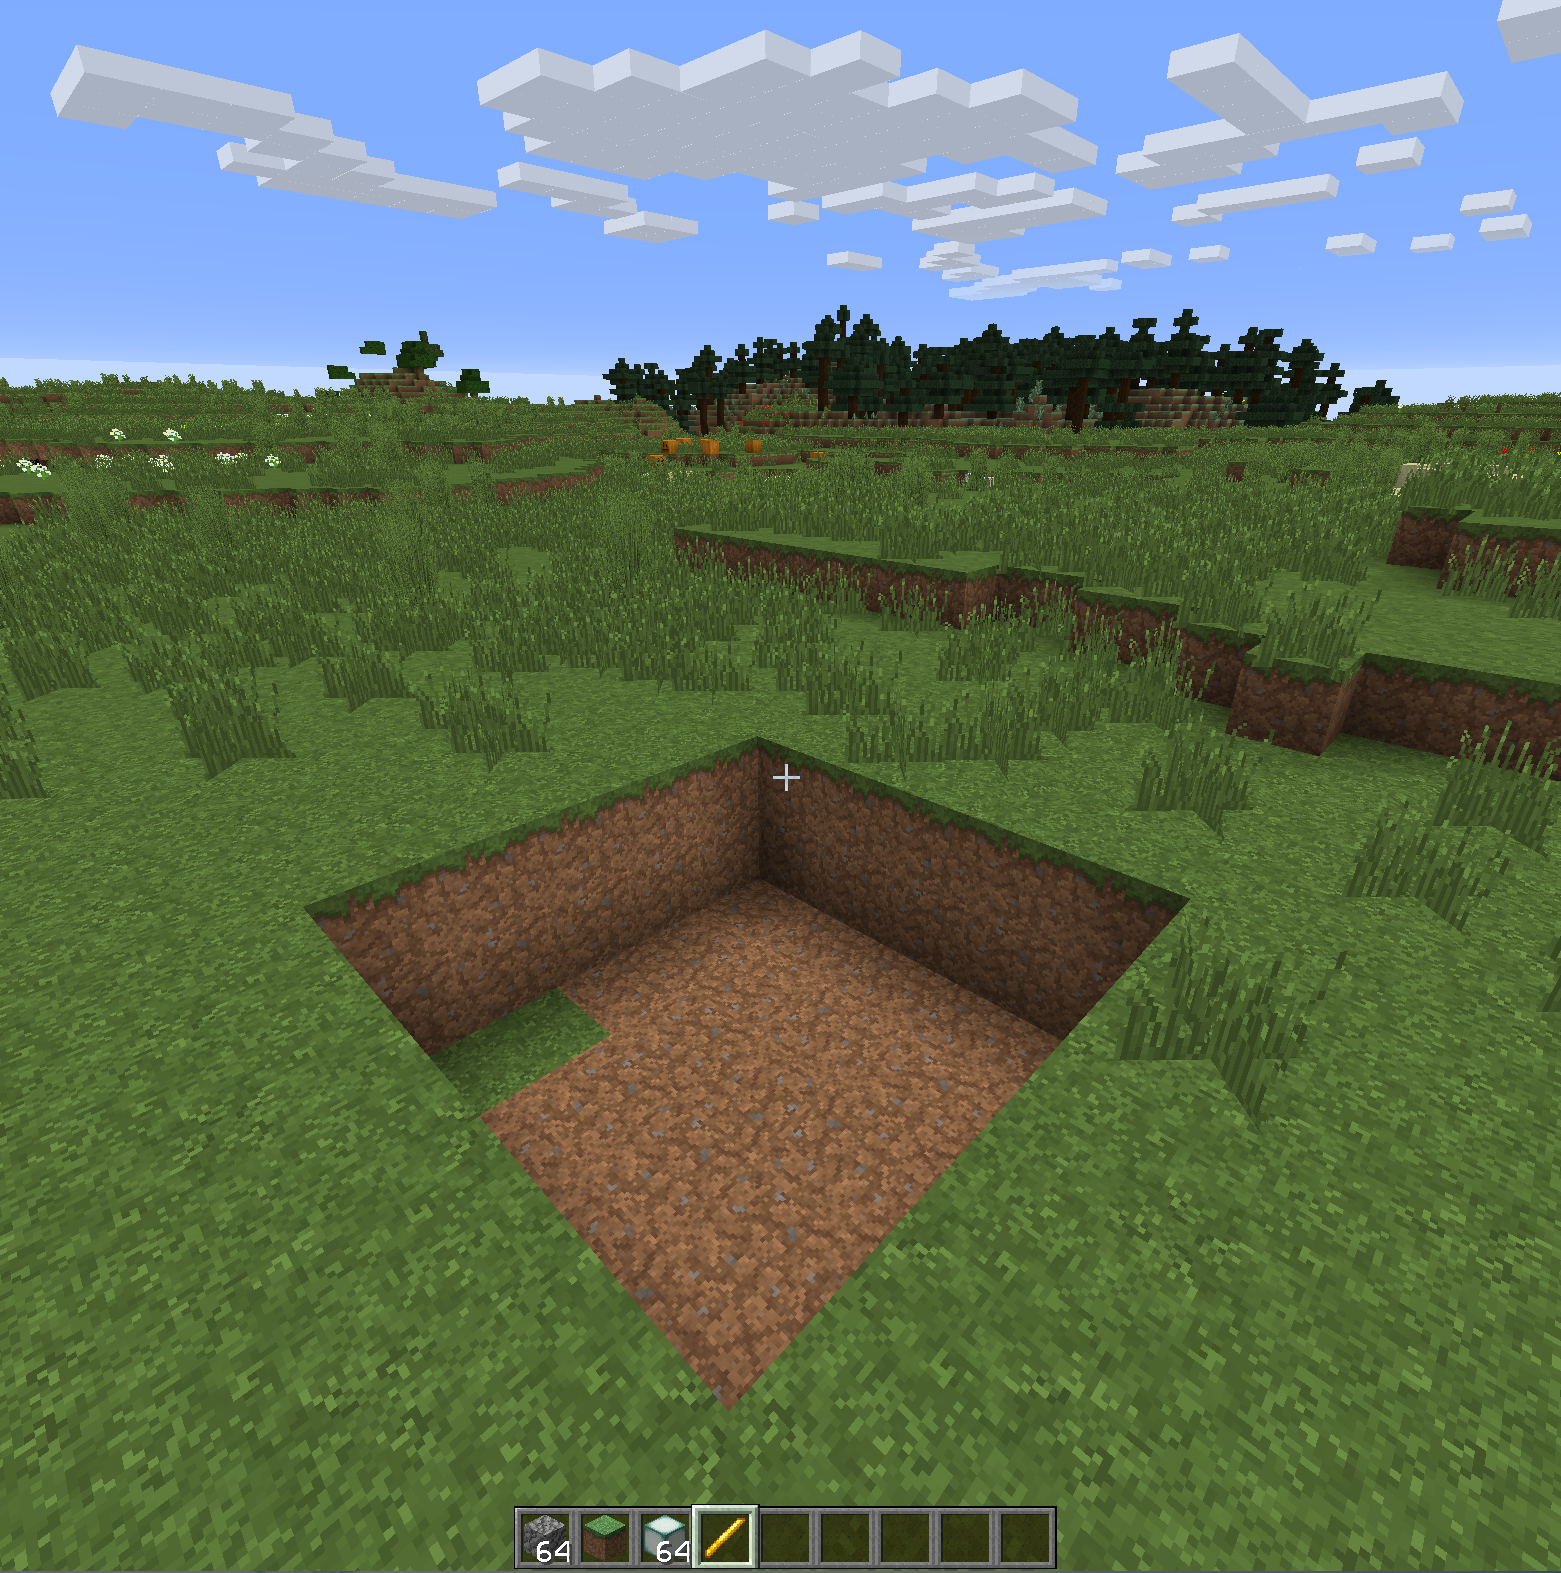
Go ahead and reset the mine. All of the sealanterns that were used to mark the mine are now gone, and so are the two layers of dirt. That confirms success with our first mine since the only default block that exists in the mines when created is air.
/mines reset test1
Mine Commands Overview
Now that we’ve created a mine, let’s take a moment and review some of the available commands. There are a lot of options available, and many of those options have numerous features, so this will just be an overview so you have a better idea of what you could possibly do with your new mines. This listing is generated within the console so it’s easier to see. This includes the main grouping of commands, which is displayed with /mines. Remember, when using commands within the console drop the leading slash. Then two sub-groups: /mines block and also /mines set.
For the following commands, we can use the console, which is also easier to see for this documentation. But these commands can just as easily be ran within game.
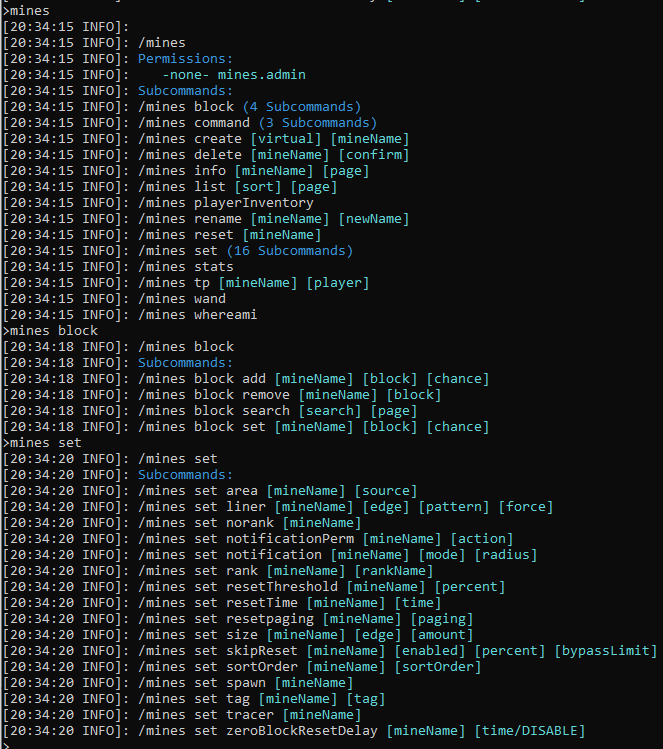
Some of the highlights of these commands are as follows:
-
/mines create: Create the mine based upon the wand selection. -
/mines set accessPermission help: Use a mine permission to grant players access to the mine. This will override WG regions and resolve issues with strange behaviors resulting from WG. This must be a plain permission and cannot be a permission group. /mines command: Take your mines to the next level! See the document on Mine Commands for more information. Every time a mine resets, you can now control what commands run right before a reset, and what runs right after a reset. These commands are similar to the Rank Commands, since they can be any command that you can run from the console. The idea is that you can have unique mines that have not been possible before, such as randomly spawned forests or specific builds./mines delete: Deletes a mine. You can always undelete a mine by going in to the server file system and rename the deleted mine, then restart the server./mines info: Very useful in viewing all information related to the mine./mines list: Displays all mines on your server./mines playerInventory: Shows your current inventory in the console. Intended strictly for admins.-
/mines rename: Renames a mine. /mines debugBlockBreakif you need to debug what’s happening with block breakage on your server, please use this new tool to get detailed account of which plugins are handling, or interfering, with the block breakage. This works both in side a mine, and outside.- They way you use this command, is in game, you will look at a block (center the cross-hair on the block), while holding a tool, or weapon of your choice, then issue the command in-game
/mines debugBlockBreak. Then look at the console for detailed information on the command’s output. It will be very detailed, and could possibly be a few dozen lines long, or more, if there are a lot of installed plugins on your server.
- They way you use this command, is in game, you will look at a block (center the cross-hair on the block), while holding a tool, or weapon of your choice, then issue the command in-game
/mines reset <mineName> <options>: Resets the mine. Forces a regeneration of all the blocks, even if the mine is in skip reset mode.<mineName>should be the name of the mine, but can also be ** all ** to force all the mines to reset one after the other. If such action is performed, then all mine resets will be done through a submission with a slight delay between each reset, and it will prevent the running of the mine reset commands to prevent possible looping.<options>should not be use directly without understanding what they do.-
/mines stats: Toggles the display of stats that pertain to how long it takes to reset the mines. View /mines info or /mines list to see the stats. Use this command again to turn it off. -
/mines tp <mineName> <playerName> <target>: tp to a mine’s spawn point, or the center of the mine if no spawn has been set. If players are given the permissions, they too can use this command. If no parameters are used, then the it will try to teleport the player to the mine associated with their current default ladder’s rank. If more than one mine is associated with a Rank, then it will use the mine that has the same name as the Rank, otherwise it will use the first mine listed in the rank. If<playerName>is provided and submitted by console or an OP’d player, then it can initiate a tp for the specified player if they are online. Target defaults tospawnand will tp to the set spawn location for the mine, otherwisetargettp’s to the center of the mine. Use/mines tp helpfor a list of the perms. -
/mtpis an alias for/mines tpand can be use interchangeably. /mines wand: Gives you a Prison selection wand for defining you mine’s area. Use prior to using the commands/mines createand/mines set area. The wand is no longer the only way to set a physical location, you can now use/mines set area <mineName> feetto set a 1 x 1 x 1 region under your feet, which is great for when you’re flying. You can then use/mines set sizeto increase the size.-
/mines whereami: Shows you what mine you are in, or how far away you are from other mines in the area. If you have a lot of mines, it’s easy to lose track of where you are, and this may help get your bearings. /mines block add: Add a new block type to a mine. It’s easier to start off with/mines block searchand have it fill in the commands for you./mines block constraint: Controls block generation within a mine, such as minimum number, maximum number, or which layers it can spawn at./mines block list: Shows all blocks within a mine, including the constraints that have been placed on specific blocks. This command is also included in the command/mines info <mineName> all./mines block remove: Remove a block type from a mine./mines block searchAll: Search for a block type or item type based up on a search string. This includes all blocks, but also all items too./mines block search: Search for a block type based up on a search string.-
/mines block setChance: Edit the block’s percentage within the mine. A percent of zero will remove the block as if the command/mines block removewas used. If the block does not already exist, it will be added. (Can replace add and remove). /mines blockEvent add: This adds one or more commands to a block event. To add multiple commands, just add a semi-colon between the commands:;./mines blockEvent add placeholders: This command lists all placeholders that can be used within a block event’s commands. These placeholders will expand the flexibility of what other commands can be used./mines blockEvent block add: Adding block type to a blockEvent acts as a filter and will only use this block even on a block type that is listed./mines blockEvent block remove:/mines blockEvent eventType:/mines blockEvent list: Use list to how all of the available blockEvents for a given mine. These blockEvent commands that edits a blockEvent are based upon the row number as listed with this command./mines blockEvent percent: Sets the percent chance of running this blockEvent. Valid ranges are 100 % which is always ran (if it passes the filters), to as low as 0.00001 percent./mines blockEvent permission: A BlockEvent permission will only allow a blockEvent to be ran if the player has this permission. This filter can be used with other filters, such as “triggered” and “blocks”./mines blockEvent remove:/mines blockEvent taskMode: Identifies how a blockEvent is ran. Options are [inline, inlinePlayer, sync, syncPlayer]. “Player” modes runs the command as if the player entered the command and runs under their perms, while non-player modes run as admin as if ran from the console. Inline and sync mode may, or maynot be selectable. Most blockEvents are now ran in another thread and will not hang the BlockBreakEvent anymore, so inline or sync may not have an impact.-
/mines blockEvent triggered: For plugins such as TokenEnchant, their explosion event identifies which enchantment of theirs triggered the event. So this filter can apply a blockEvent to a very specific enchantment. /mines set area: This command places a virtual mine, or it allows you to redefine the area of the mine. Careful, this can wipe out builds if set incorrectly. This is a required command to set the area of the mine. A new feature is to use the current location of your feet to define a 1 x 1 x 1 region with/mines set area <mineName> feet. Then you can use/mines set sizeto make it any size you want.-
/mines set area <mine> virtual: This command will remove a mine from a world, and make it virtual. A virtual mine can then be placed somewhere else, or even in a different world. Virtual mines will not try to go through resets, so it’s a safe way to disable a mine if you’re not ready for it to be active. /mines set accessPermission: Uses permission to enable access to the mine. This does not use the player’s rank, which is the suggested method so as to reduce the number of perms that need to be configured and managed./mines set mineAccessByRank: Uses the player’s rank to control access to the mines. This is the preferred method of controlling access since it reduces the number of perms that Prison has to manage, and can help bypass the need of using WorldGuard regions to control the players.-
/mines set tpAccessByRank: Uses the player’s rank to control the player’s ability to teleport to the mine. See the command/mines tp. -
/mines set liner: A quick way to wrap your mine with a 2D Pattern in 3D space. This command also willrepairthe area around a mine, and will effectively erase a liner. There are six directions that can be specified for change:north,south,east,west,top, andbottom.wallsalso is a shortcut fornorth,south,east, andwest. The patterns available are listed by the command. There is even aforcesetting that will allow the mine to be wrapped when in air, since the wrappings normally needs blocks in contact with the mine so it is able to conform to the terrain. -
/mines set mineSweeper: If all else fails to get Prison to monitor and track blocks that are broken within a mine, mostly due to conflicts with other plugins, then this option can provide a last chance effort to monitor the progress within a mine. It is very rare that you would have to use this setting and the chances are that there are better ways to get the mines working correctly. The larger the mine, the more costly this setting is to enable. -
Removed:
/mines set moveis a new command that is not yet enabled. It is still in development, but will be active soon. This command will move a whole mine as a single unit, be it a few blocks or many (not recommended). The same effect of moving a mine can be done through the command:/mine set sizebut note it will possibly damage or destory the surrounding builds if not careful. - Removed:
/mines set norank: Disconnect the mine from a rank. Note: This command has been changed to/mines set rank <mineName> *none*to delete the rank from the mine. /mines set notificationPerm: Enables or Disables notifications pertaining to mine resets to be seen only by players who have permission to that mine. The permissions used aremines.notification.[mineName]in all lower case./mines set notification: Can turn off the notifications on a per-mine basis. Or set the notification radius, or only notify players within the mine. This command cannot change the message.-
/mines set rank <rankName>: Links a mine to a rank, otherwise there is no way within prison to identify which mines should be associated with a given rank. If rankName is none then it removes the associated rank from the mine (deletes the rank). This is not yet needed, but it will be used in the near future with new features, or enhancements to existing features. /mines set resetThreshold: This allows you to set a percent remaining in the mine to use as a threshold for resets. For example if you set it to 20.5% then the mine will reset when it reaches 25.5% blocks remaining. When the mine resets, it will initiate thezeroBlockResetDelayfunctionality, of which it’s not exactly “zero blocks” anymore.- Please be careful if using values that are way too high, such as over 90%, as it could possibly result in such frequent mine resets per second, that the internal mine-locks could become corrupt or stuck. If this happens, please manually reset the mine with
/mines reset <mine> force. - Excessive mine resets can cause lag and other server performance issues. This would not be considered a bug or a design flaw. It’s more so a configuration issue, so use at your own risk.
- To find out how many mined blocks it will take to reset the mine, use this formula, which example of 98% threshold in a mine that is 30 x 15 x 30 (13,500 blocks):
- blocks-to-reset = total-blocks * (1.0 - percent-reset-threshold)
- blocks-to-reset = 13,500 * (1.0 - 0.98)
- blocks-to-reset = 13,500 * 0.02
- blocks-to-reset = 270 blocks
- You may want to consider how quickly a player can mine blocks with the highest efficiency pickaxe that you allow on your server. Then multiply that projected value by the number of players that may be mining together in the mine. In general, you would want to increase the total blocks mined before resetting the mine, which will do a much better job of handling a large number of blocks being removed per interval.
- Please be careful if using values that are way too high, such as over 90%, as it could possibly result in such frequent mine resets per second, that the internal mine-locks could become corrupt or stuck. If this happens, please manually reset the mine with
/mines set resetTime: Changes the time between resets, as expressed in seconds. Applies to each mine independently.- Removed:
/mines set resetPaging: This no longer is a setting, since Prison always uses a more advanced type of paging that dynamically prevents server lag. This is an advanced feature that can eliminate lag that might be experienced with the resetting of enormous large mines. A mine could be millions of blocks in size and without this setting it may take a few seconds, or longer to reset, and it could cause the ticks to fall far behind, even to the point of forcing a shutdown. This command instead will breakdown the mine’s reset in to very small chunks that will prevent the TPS from slowing down, and it will allow other critical tasks to continue to run. The total length of time for the rest may be increased, but it will not hurt the server. Prison does not use async resets due to eventual corruption of the bukkit and spigot components. -
/mines set size: Allows you to resize a mine without redefining it with the prison selection wand. Just specify which direction to increase or decrease. It also uses the/mines set liner <mineName> repairfeature to fill in voids when reducing an edge. -
/mines set resetSkip: When enabled, can prevent a mine from resetting if it has no activity. Can set a threshold before the mine is reset, such as 80% will require 20% of the blocks be mined before being reset. Can also set a bypassLimit so that if the reset is skipped X number of times, it will force a mine reset. This command is good for reducing server load for mines that are not that busy. /mines set sortOrder: Mines can be sorted for view within/mines listor the GUI. Setting the sortOrder allows you manually set the order in which the mines are listed. There is even the option to suppress (hide) mines from that list too by setting the sort order to a -1./mines set spawn: Sets the mines spawn point. Whatever you are looking at is what the players will be looking at when they tp to that spot.-
/mines set tag: Set a mine tag value that can be used with placeholders. /mines set tracer help: Removes all blocks in a mine and replaces them with air. This is good to allow you to access and work on the liners or ladders. There are three options with this command:outline,cornersandclear. The optionoutlineis the default and will use this option unless the others are specified.outlinewill apply pink glass blocks along the outline of the mine.cornerswill only place pink stained glass blocks in the 8 corners of the mine. Andclearwill add no tracers and will result in a fully cleared mine. This function allows for easy viewing of the full mine without the blocks getting in the way. It also helps when setting the liner of the mine. Using/mines resetreturns the mine to normal functionality, or it will reset on its own.
.
/mines set zeroBlockResetDelay: If the mine runs out of blocks, when enabled, it will force a manual reset after the specified delay. The delay can be zero for instant reset.
Adding the term help to the end of any of the above listed commands will display additional information that is available for each command, including the parameters and also all permissions that are associated with the commands.
Customizing Your Mines
Now that we have a mine created, let’s go ahead and customize it.
Inspect our New Mine
Let’s first take a quick look at the new mine with this command. Let’s view it now, before we start making changes.
/mines info test1
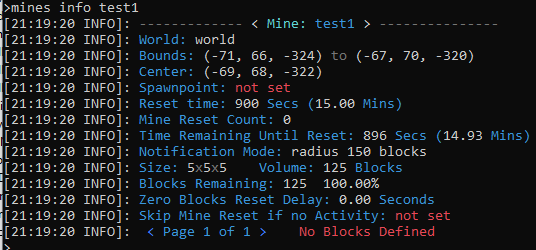
The command /mines info <mine> all provides more details such as the block lists, the commands tied to the mine, and blockEvents for the mine.
Select a Few Blocks
The easiest way to select blocks is to search for them. Let’s add a few such as cobble, glowstone, gold ore, and coal ore. Use the block search with cobble:
/mines block search cobble
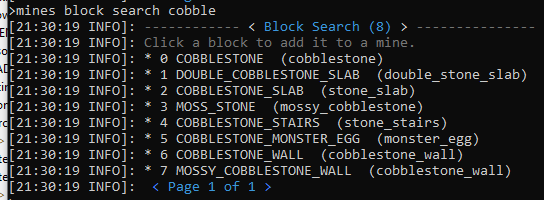
Note: /mines block searchAll will also include items in the search results. Item are used with the sellall shop and the creation of Mine Bombs items.
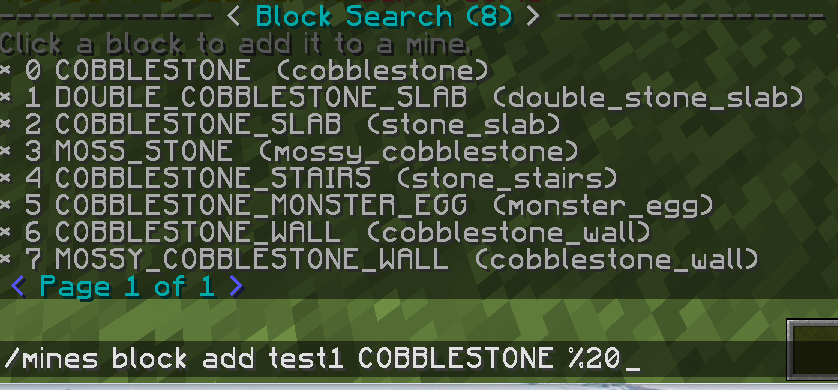
When using the console with block search limits what you can do with the block search. If you are in game, you can click on a block type that is displayed, and it will auto fill out the block add command for you, such that all you need to do is add the percentage at then end of the command. Also in game, you can page through the results.
This is an example of in game use of this command. Notice by clicking on cobble it pre-fills all the parameters for the /mines block add, including the most recently used mine name and the selected block. This screen print shows that I added the value of 20 right after the percent sign.
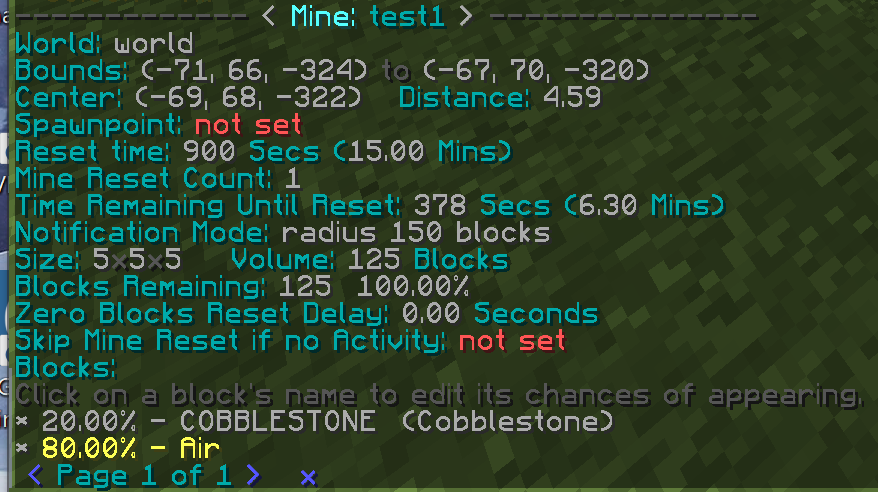
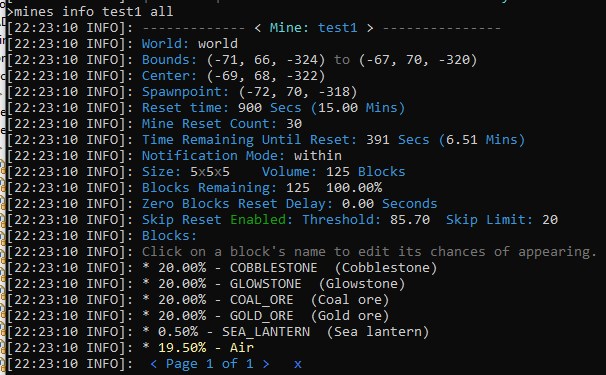
Then let’s take a look at the /mines info test1 all command, where all indicates all pages should be displayed in-line without paging. Notice how Prison automatically provides the balance of air so the total percent is equal to 100.0%.
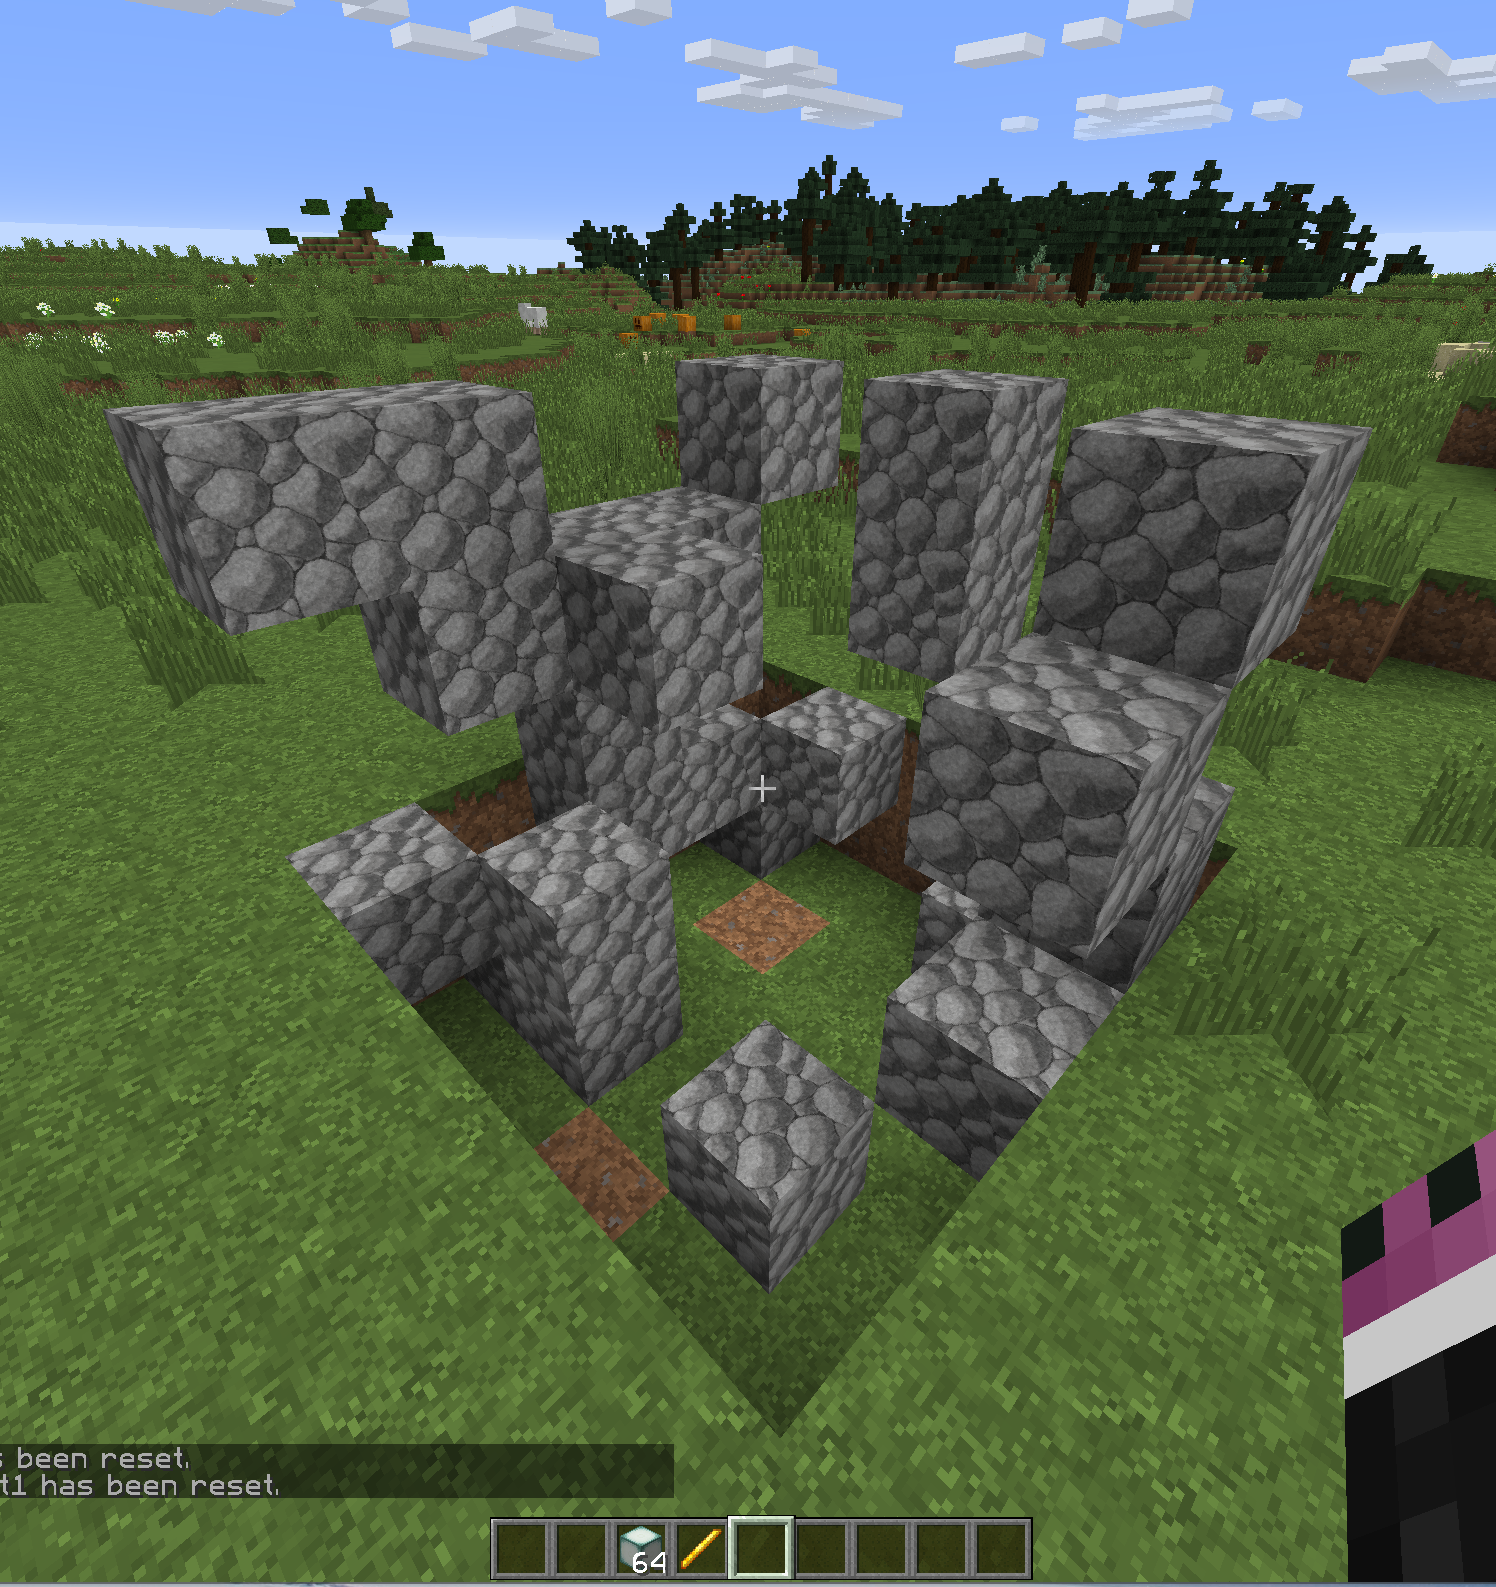
Now if we perform a /mines reset test1 then we can see how the cobble is randomly placed at a rate of 20%, and the remainder is air.
Let’s add the other blocks, each at 20% then take a look at the mine info and how it generates. Please notice that you can add a single block with as little as 0.01%. You can also add as many different blocks as you please too. There are no meaningful restrictions.
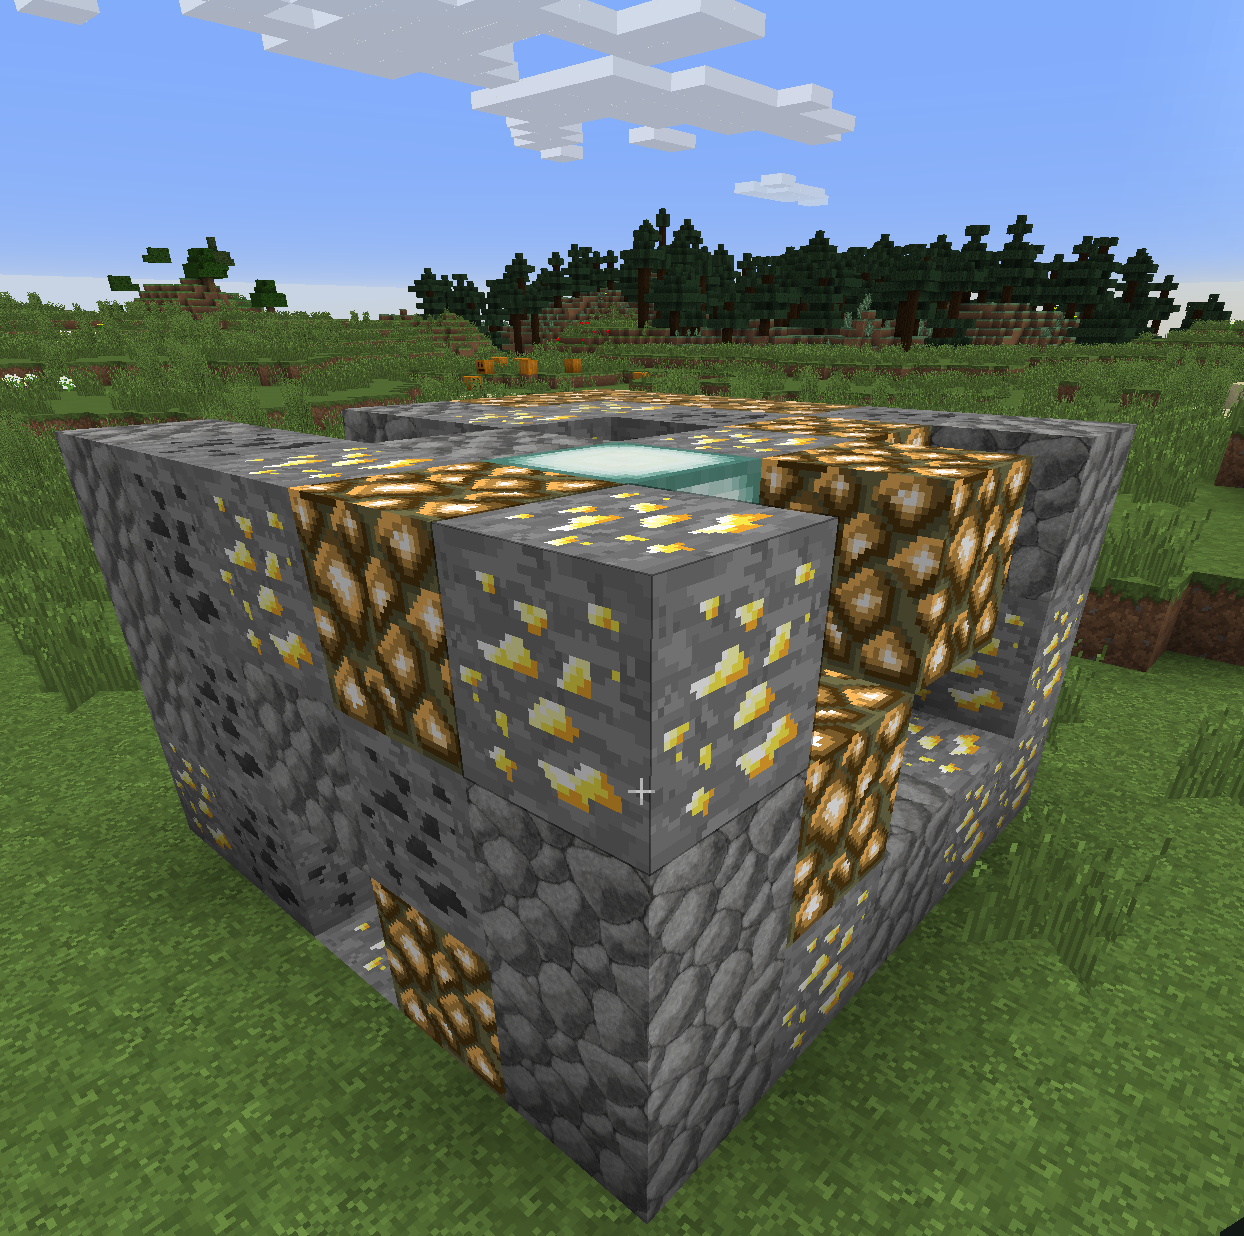
With the additions of the other ores, including 1/2 a percent of sealanterns:

Example of a mine reset including a sealantern. Notice that there is still 19.5% air.
Allowing Players to place blocks in mines
Normally, players are not allowed to place blocks in mines. Prison will identify that the blocks placed by players were not placed by Prison during the last mine reset, and therefore will fast-fail and ignore that block.
By default though, prison will cancel the event, no matter what setting you have for general events, such as cancel events, or canceling the drops.
To override this behavior, so players can actually break blocks within mines, you need to change the autoFeaturesConfig.yml file’s setting:
ifBlockIsAlreadyCountedThenCancelEvent: false
You can then reload the settings without restarting the server:
/prison reload autoFeatures
By default, this setting is set to “true” so older installs of Prison will not break when they upgrade to a version that supports this feature.
Just because prison is now ignoring the block break, this does not mean the player can break the block. This technically means that prison is doing nothing with it; not even canceling the event. So other plugins will be allowed to process the block. For example, WorldGuard may reject the player’s access and prevent block breakage, and then WorldGuard will cancel the event.
To address this issue, you would need to setup a WorldGuard region covering the whole mine, and then allowing the players to break blocks within the mine. This will allow the block to pass through to other plugins. If not other plugin does anything with the block, then bukkit will break the block normally at the end of handling the BlockBreakEvent.
Adjusting the Mine’s Size and Setting the Liner
A few new features have been added to Prison to help make some adjustments to your mine. They are the following:
/mines set tracer help
/mines set size help
/mines set liner help
/mines set move help
These three new commands are used together in various ways. The command /mines set tracer is used within the /mines set size and the /mines set liner commands. The /mines set liner <mineName> repair is used within the /mines set size command to repair the areas that left as voids when resizing the mine.
Note: The new command /mines set move is not yet enabled. It is still in development, but will be active soon. This command will move a whole mine as a single unit, be it a few blocks or many (not recommended).
Large Mines - Preventing Lag
Large mines present their special own special challenges, one of which is that they can take a long time to reset. Since bukkit cannot handle async resets of blocks because of world corruption, the updates must happen synchronously in the main server thread. For large mines, that can mean causing a significant amount of lag.
To prevent causing lag, Prison now implements a reset paging for all mines. This is an advanced feature that actively monitors the system performance and will auto page when the server load increases, or if the current reset is taking too long. Since this is an active paging feature, that dynamically adjusts for server loads, resetting a lot of mines at the same time, even super-huge mines, would be difficult to cause lag. Even if a lot of other tasks are running on the server, a mine reset cannot lockup the server. As the load increases, the mine resets may take longer to perform, but the ticks per second will not drop by much to cause lag.
Paging is where the number of blocks that need to be reset, are broken up in to smaller chunks, or pages. The page sizes are defined to be a certain size, but if performance becomes an issue, then those chunk sizes can be reduced to allow more of the other tasks to run so lag is minimized. This process is active and responds to dynamic server loads as they occur at any stage of the reset. This even will behave well if many mines try to reset at the same time… it can be viewed as like shuffling a deck of cards where one mine will reset a few blocks, then the other mine, and they will take turns until the mines are fully reset. In between each mine, other system tasks, or other plugins can get a chance to run so as to not hog all of the CPU power, which would otherwise lead to lag.
Prison’s paging for mine resets are very much similar to Preemtive Multi-tasking, but instead of bukkit managing the paging, prison itself is managing it’s own use of the server’s processor to ensure other bukkit tasks, and other plugins, are able to get processing time. It when the bukkit tasks and other plugins are unable to get processing time is when lag becomes an issue and is obvious.
Next Steps - Skipping Resets, Notifications, and Zero Blocks
The mine is now usable as-is, but there are still a lot of options that we can add to enhance the mine’s behavior to better suit our needs. For example, we can set a spawn point so we can control where players are teleported to when the mine resets, or if they tp to the mine.
For our example, let’s use the console to set the notification, resetTime, skipRest, and the zeroBlockResetDelay. We must be in game to set the spawn point since it uses where your player is standing and where you are looking.
Customizing the Mine
Issuing all these commands through the console, such as the following. Note that the spawn point has been set in game, and the reset time has not be changed.

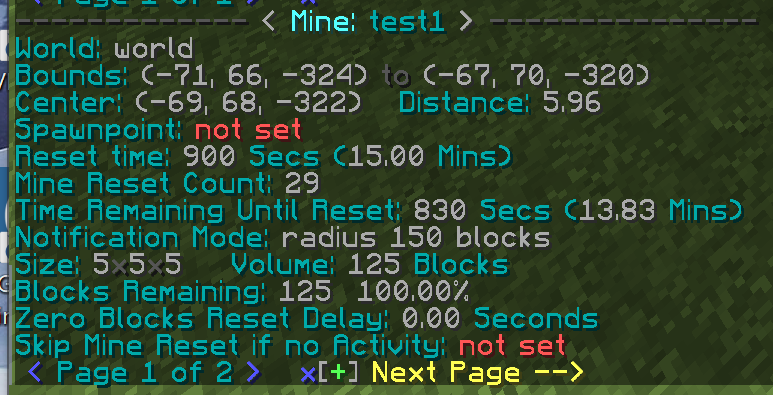
Mine info showing all changes. Observe the spawn location now shows an actual location, but yet it does not show the pitch or yaw. The information also shows that the mine has reset 30 times since there server started, and that you must be standing within the mine to receive reset notifications.
Notifications Explained
In the example above, the notifications for that mine was set to only provide them to the players that are within the mine. The other options are disabled and radius from the center of the mine.
/mines set notification test1 within
Notification Permissions Explained
The command /mines set notificationPerm is able to control who is able to see the notification messages that are generated from a mine based upon permissions. This setting worked in conjunction with the other notification settings to fine tune the behavior even more so.
This works by enabling the permission mines.notification.[mineName] to be checked when generating mine notification messages. To use this feature, enable the setting and then give the players that permission as they rankup.
Skip Reset Explained
To better explain what the skipReset does, is it uses the threshold percent as the trigger to allow the mine to auto reset. Once the blocks remaining value hits that value, or is less than that value, it will alloow the mine to rest at it’s normal reset time. If the blocks remaining is higher than the threshold, then it skips the reset and increments the skip counter (not shown in this screen print since it is zero). Once the number of skips reaches, or exceeds, the Skip Limits value, then it will allow the mine to reset.
This behavior allows unused, or barely used, mines to avoid from always being reset. This can reduce the server load and prevent lag on larger servers, or if there are many mines.
This feature never will force a mine to reset early, nor will it ever make it reset. The only active behavior it can alter, is to skip the automatic reset behavior.
If a mine is manually reset, then this feature will never prevent a manual reset from happening. A manual reset will also reset the counter for how many times the mine skipped the automatic resets.
Zero Blocks Reset Delay Explained
The feature zero blocks reset delay identifies what should happen when Prison detects that there are no more blocks within the mine. The only action actually is to force an early reset if this feature is enabled, but more specifically, it identifies how many seconds it should delay before forcing the reset.
If this feature is enabled, and the delay value is set to Zero, then the mine is forced to reset with no delay. If there is a light load of jobs running on the server, then it will be instantly reset, otherwise there will be a delay for the job to wait its turn to run.
If the reset delay is non-zero, the value is measured in seconds, with a valid value of 0.01 seconds. But keep in mind that in reality the seconds are converted to ticks and is scheduled within the Bukkit job queue. Therefore, since there are 1000 milliseconds within one second, and 20 ticks within one second, one tick is the smaller possible value, which equates to 50 milliseconds. This is equivalent to 0.05 seconds. When the seconds are converted to ticks, the values will be rounded down to a whole integer value. So if a value is provide such as 0.049 it will be submitted as 0 ticks, which will result in zero delay (if possible) before running.
The bottom line is that this feature can force an earlier reset of the mine when it becomes totally empty of blocks. A delay may be needed, or desired, to reach your perfection for the mine.
Reset Threshold Percentage Explained
By using the command /mines set resetThreshold it is effectively able to shift when the mine resets. It does not delay when the mine resets, but instead it provides way to trigger a reset based upon a percentage of the mine that remains. It works in conjunction with Zero Block Reset Delay too, where instead of waiting until zero blocks remain, it then applies a percentage to change the reset level.
A mine that is 10,000 blocks, when the resetThreshold is set to 90%, the mine will reset after about 1,000 blocks are mined (10%). Setting this value too high, like even over 80%, does not make sense. It would be far more efficient, and easier on the server’s TPS to instead make the mine much, much smaller. Setting this to a high percentage is bad overall, because the mine will reset with a fraction of it’s total blocks being mined, but yet a mine reset will replace all 100% of the blocks in the mine, which can contribute to server lag if the frequency is way too high.
Very high values can also result in prison resetting the mine many times per second, especially if there are multiple players mining with very high efficiency pickaxes being used. It is also very much possible, that if the mines are being reset a few times per second, or even every few seconds, that the internal mine-locks that are being used could have their state become corrupt and therefore prevent the mine from resetting. If this happens, the locks should auto-release after 5 minutes. But you can also manually force a reset to fix them with /mines reset <mine> force.
Notifications - Config File & Settings
The global resetMessages, resetTime and resetWarningTimes, as found in the configuration file plugins/Prison/module_conf/mines/config.json needs a little explanation in what they do.
The resetMessages is used only upon the server startup, and if it is disabled, then it will not use the resetWarningTimes and will skip all notifications pertaining to mine resets. The resetWarningTimes are global and cannot be customized per mine. If an individual mine’s reset time is less than a warning time, then the reset warning will be skipped for that mine.
The resetTime in this configuration file is only used during the creation of a mine and is used to set the initial value for the mine’s reset time. If the configuration file’s value is changed, it will never effect any preexisting mines, but only ones created after it has been changed.
All mines use their internal reset time and can be customized on a per mine basis using the following command. The command’s time value is expressed in seconds.
/mines set resetTime <mineName> <timeInSeconds>
There are a number of options available for mine notifications, and they are on a per mine basis to allow better control over how to configure everything. The command is as follows. The value for mode can be disabled, within, or radius. When radius mode is specified then the radius value must be supplied, and it is expressed as whole blocks (integer).
/prison set notification <mineName> <mode> <radius>
The disabled option is pretty much self explanatory; messaging for that mine is disabled.
The within the mine notification only provides notifications to the players that are within the boundaries of the mine, including players standing upon the top of the mine. One of the behaviors to this mode, is that all players within the mine will be notified that the mine will be reset, but once they are teleported out of the mine to the spawn point they cannot be notified that the mine has been reset (because they are no longer within the mine). But then again, the fact they were teleported to the spawn point should be a big clue the mine reset.
The radius setting notifies players that are within the specified distance from the center of the mine, ignoring the Y axis. So if the distance is set to 30 blocks, and they are within that radius, but 200 blocks above the mine, they will be notified. Since the center point of the mine is calculated to be the, um, center, it is possible to make the radius smaller than some points of the mine and still be outside of the mine in other places. So this can provide some nice controls at far distances away from the mine, but could produce some odd behaviors (if you don’t understand how it works) if the radius is much smaller in size.
Perhaps the last point pertaining to resets has to do with the actual timers. Once a mine is reset, either by automatic resets, zero block resets, or a manual reset, the timer will always reset and start over. This means if there is 30 seconds left on the timer and you do a manual reset, the automatic reset will not happen 30 seconds later.
Listing All Mines
As you start to build your mines, you may find it useful to list them all, or use the listing to search for a specific mine.
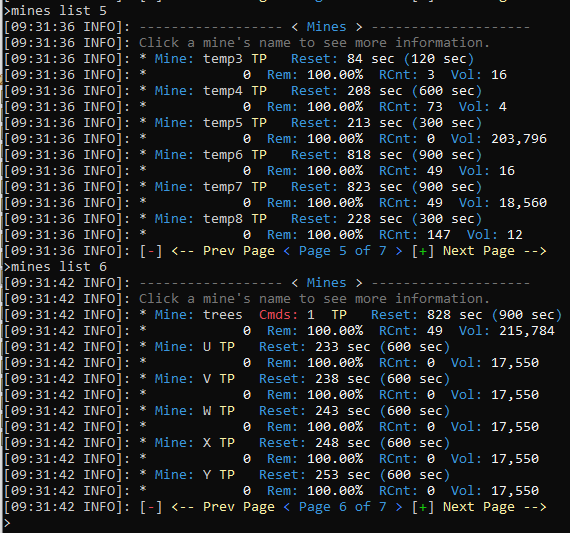
Here are some basic usages of the command. First let’s review the help for the /mines list command to see what perms are needed and what parameters are available. If you are in game, clicking on TP will teleport you to the mine. Clicking on the name will show you the info on the mine, which is the same as using the /mines info command. Of course, clicking on these items only works in game, and not from the console.
/mines list help

/mines list

/mines list 4
As we can see in the screen print of the help, the command takes optional parameters for the page number. It also has the option of ALL which will display the list of all mines, which could be helpful in the console.
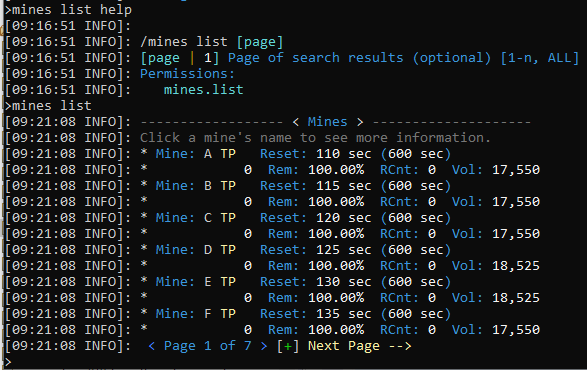
There is some useful information in the listing too. This listing shows how soon a mine will Reset, and what the reset frequency is. It will show you how many times it has been reset since the server started (RCnt). It even shows the percent blocks remaining too (Rem). If you’ve added any mine commands, those will indicated in a red Cmds entry; see the mine named trees. Also if a mine is disabled, it will be listed here too.
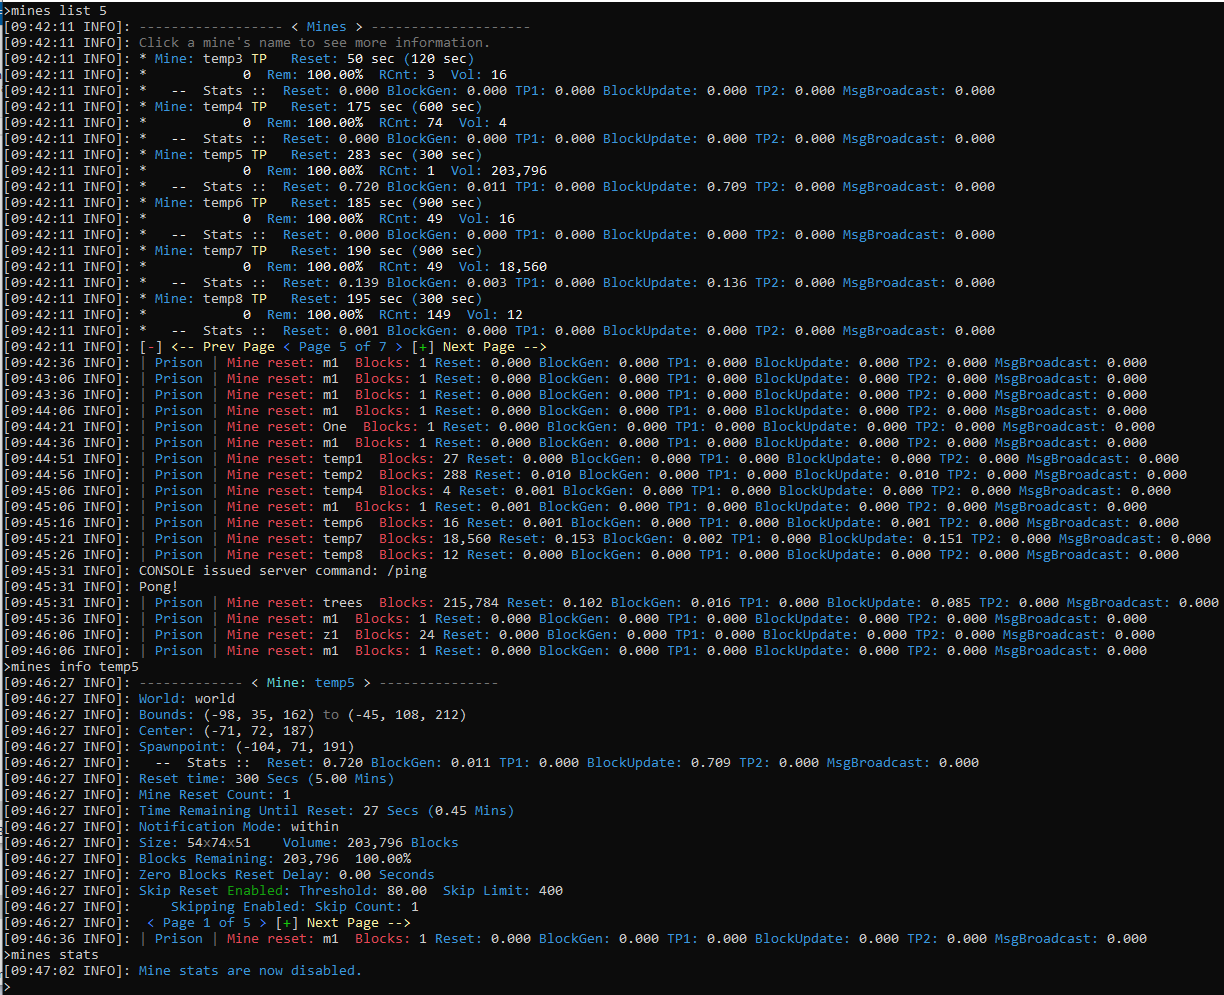
This listing also shows more details if you have /mines stats enabled. Remember that mine stats is a toggled setting. Run it once to enable it. Run it a second time to disable it.
With it enabled, it shows stats on mine resets in mine list, mine info, and when mines reset in general. The following screen print within the console shows how these may look, with the addition of the stats.
.
Virtual Mines and Disabling Mines
Mines can be change to virtual mines or disabled. More information to be provided on these subjects. Please contact us on our discord server for help if needed.
Deleting Mines
Mines can be deleted with the /mines delete command.
It will prompt you for confirmation. If you are in game you can click on the link then it will fill out the command for you with the parameter cancel and you need to rename it to confirm. You have one minute to confirm a delete.
When you successfully delete a mine, it will remove it from memory and from loading. The mine is only virtually deleted, since it will still exist in the server’s directory. To undelete it, just rename the file back to a normal mine file name, and it will be loaded the next time the server starts.
Renaming Mines
Mines can be renamed with the /mines rename [mineName] [newName] command.
The ability to rename a mine will properly update all references to the mine.
The Mine Data Files - A Warning
The mine data files (and also the ranks and ladders) are stored on the server’s file system as a way to store each mine’s configurations. These files are intended for internal use only and should never be manually modified. When undeleting mines, you may have to rename the files so they are used the next time the server is started, but you should not change the contents.
There are many commands that have interdependancies to multiple settings, and those settings are validated only through the use of the commands. Making changes directly to the files bypasses the validation of the commands and may lead to server corruption and failures.
You are solely responsible for any problems you create by making changes directly to these files. We cannot help undo any problems, issues, failures, or undefined behaviors that may be caused with such tampering.
Advanced Topics
Changing the Size of a Mine
Example: A Single Block Mine Grinder
To provide a slightly different perspective as to what you can do with your Prison mines, let’s build a one block mine and demonstrate the power of what we can down with a few of these settings. We’re also going to tie this in to HolographicDisplays and use of the placeholders.
So let’s first setup a temporary placeholder for our new mine. I want it to be a one block mine, one block off the ground. So stack two blocks like this. Added a platform, because why not?
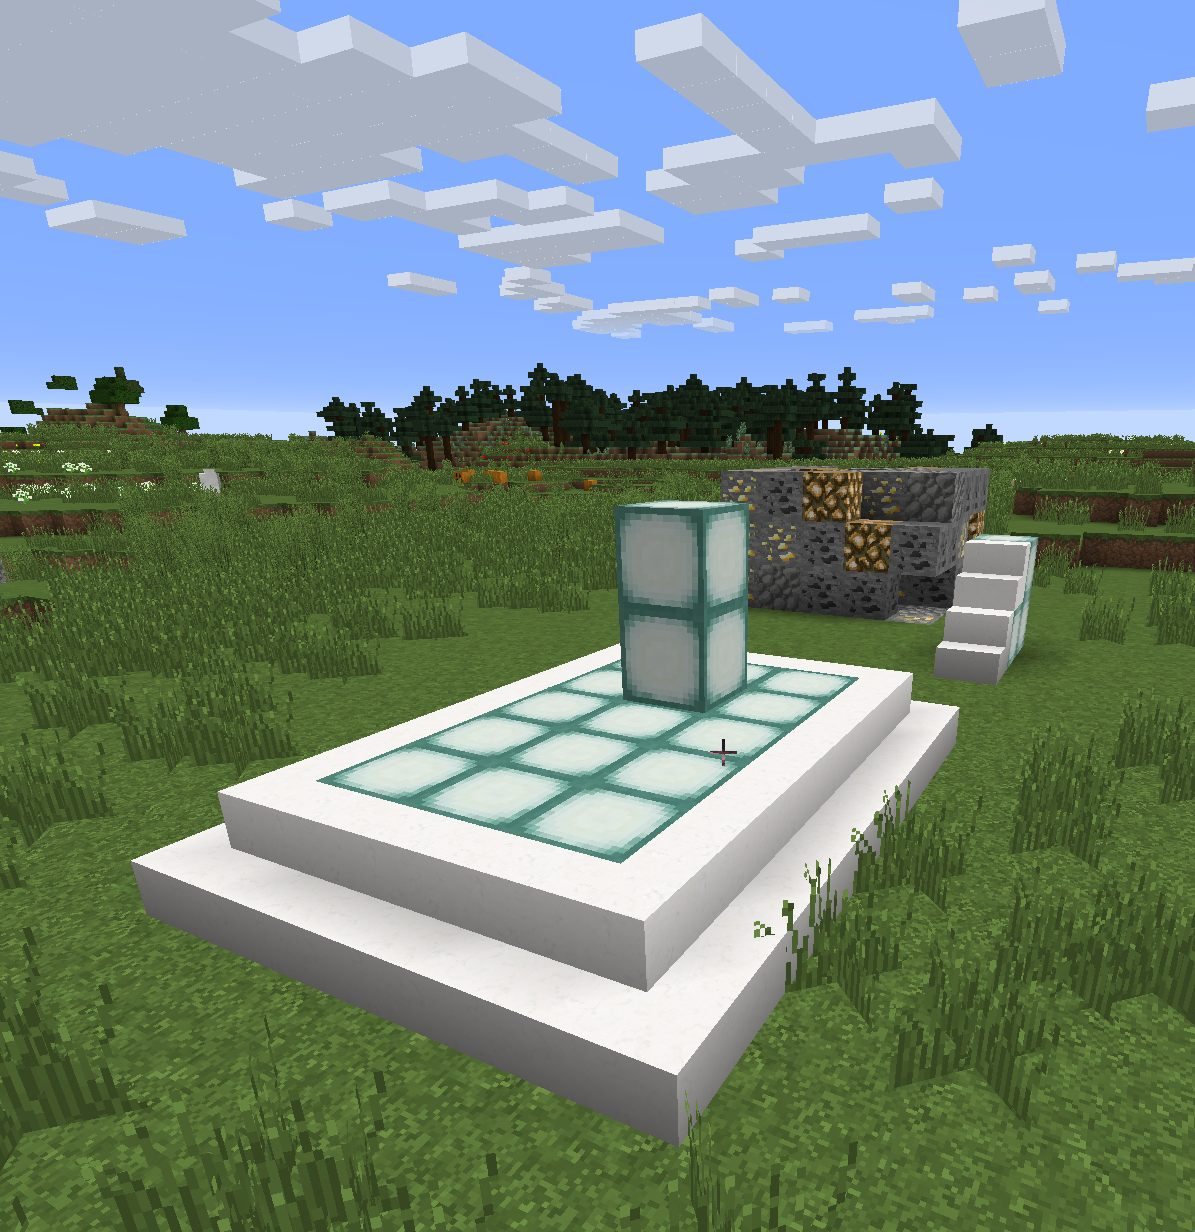
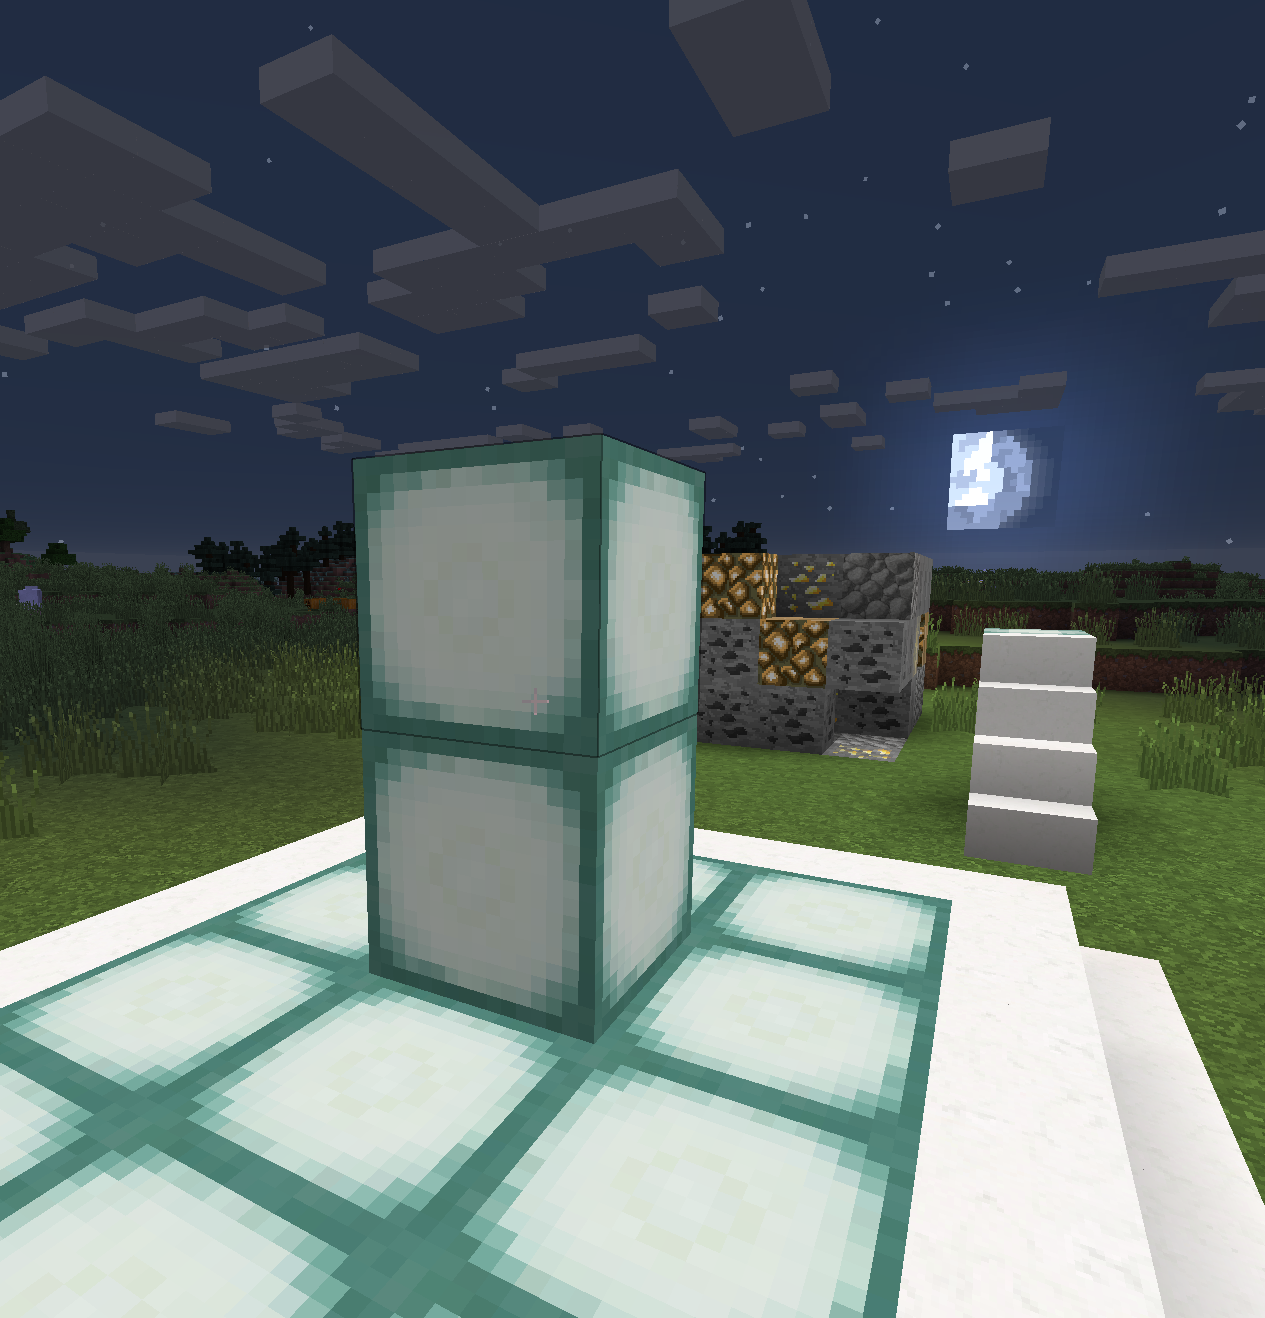
Next, using the Prison wand, right-click and left-click on the top block. This will create a one block selection. Then create the mine, naming it one.
/mines create one
/mines block search ore
Then select the following ores and add them to the new mine, all at 10%. Add gold_ore, iron_ore, coal_ore, Lapis ore, redstone_ore, emerald_ore, diamond ore, etc… Then setup the reset time, turn off notifications, and set zero blocks reset delay to zero.
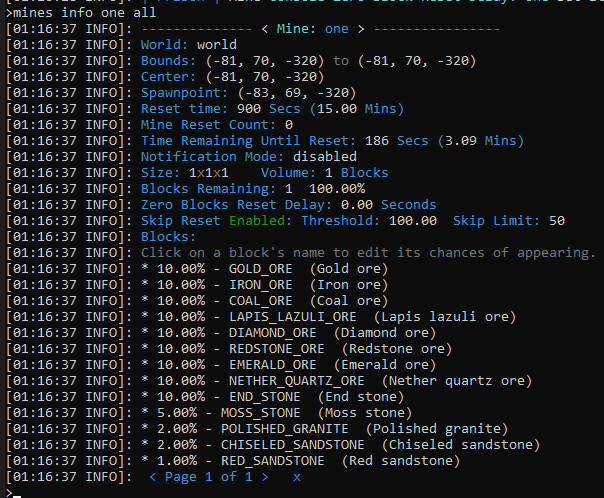
Now let’s test our new mine. But first let’s make an OP pick. Open the config file /plugins/Essentials/config.yml and search for unsafe-enchantments and set the value to true and then save and exit the file. You can either restart the server, or use /essentials reload to apply those changes. Then issue the commands in game, holding the pick after you get it.
/essentials reload
/give <yourIGN> diamondpick 1
/enchant efficiency 20
/enchant durability 20
/enchant fortune 5
Remove the block under the one block mine, then reset it with /mines reset one.
Install HolographicDisplays as described in our documentation (see table of contents… must include HolographicExtensions and ProtocolLib). Next we want to create two holographic displays for our one block mine, one above the block, and one below. Do the /mines info one to find the Center of the mine, and let’s use that to modify the HolographicDisplay scripts below. In this example, our coordinates are (-81, 70, -320). Add these to the file /plugins/HolographicDisplays/database.yml…
oneTop:
  location: world, -80.5, 72.5, -319.5
  lines:
  - 'Mine: one'
  - 'Reset Interval: {slowest}%prison_mines_interval_one%'
  - 'Reset Time Left: {fast}%prison_mines_timeleft_one% - {fast}%prison_mtlf_one%'
  - 'Blocks Remaining: {slowest}%prison_mr_one% {slowest}%prison_mp_one%%'
oneBottom:
  location: world, -80.5, 69.8, -319.5
  lines:
  - 'Blocks Mined: {fast}%prison_mbm_one%'
  - 'Reset Count: {fast}%prison_mines_reset_count_one%'
Once you make these changes and save them, reload bolographic displays with /hd reload. You can then tweak the position of the HolographicDisplays so they are just centered on the mine, and keep reloading until you get it right. The X and Z axis should be x.5 and z.5, or “point 5”, or half blocks to exactly center them. First get them centered on the mine, you can walk around the mine to confirm it looks centered. Then move each one up, or down, as needed. With the results looking like the following:
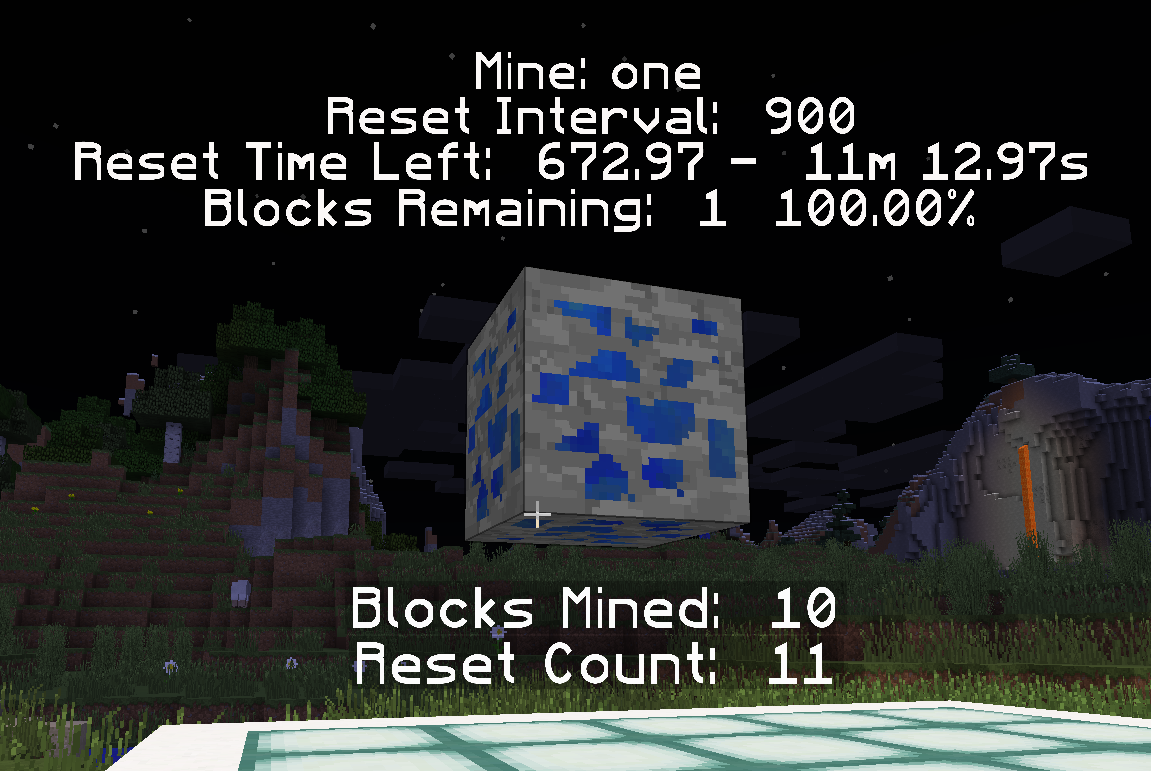
Now to complete this mine, let’s enable auto manager. We can do that by turning on Auto Manager for all of our mines, or we can just add a few ore entries to our OP pick. For this example, let’s go with the lore. Enter these commands (assuming you have Essentials installed). Using /prison autofeatures command to review the correct names for the lore. Please note for this example I’m using 100% since no numbers are specified with these Lore names.
It should be noted that Prison’s Auto Features is currently in a state of development and may change with how these settings should be applied. Efforts will be made to keep these instructions up to date, but they may be missed. If you notice that this has happened, then please contact RoyalBlueRanger on the discord server and he will get this corrected. ### Auto Features are not needed to demonstrate this one block mine, but it does illustrate a few more capabilities that exist within Prison and how a few settings can provide a different experience.
/prison autofeatures
/i diamondpick 1 efficiency:20 durability:20 fortune:5 lore:Pickup|Smelt|Block
More information on the EssentialX’s lore settings can be found here: EssentialsX Item_Meta.
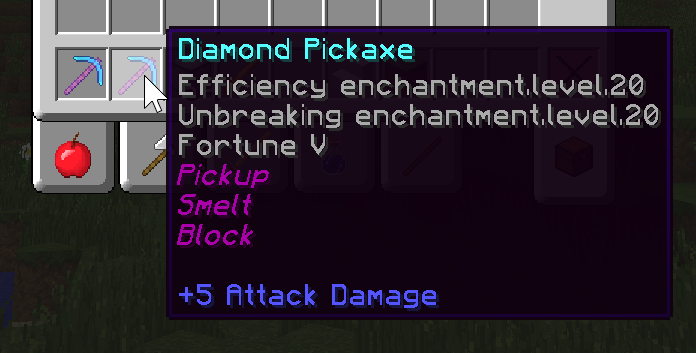
Note, because we are using Lore on your pickaxe, we don’t have to enable the auto features, such as with AreEnabledFeatures, but the individual elements should be all be set to true, or the AllBlocks should be set to true. The Lore on a tool can bypass the global settings. Also make sure you drop back in to survival mode to get the normal speed for your OP pick.
/gamemode survival
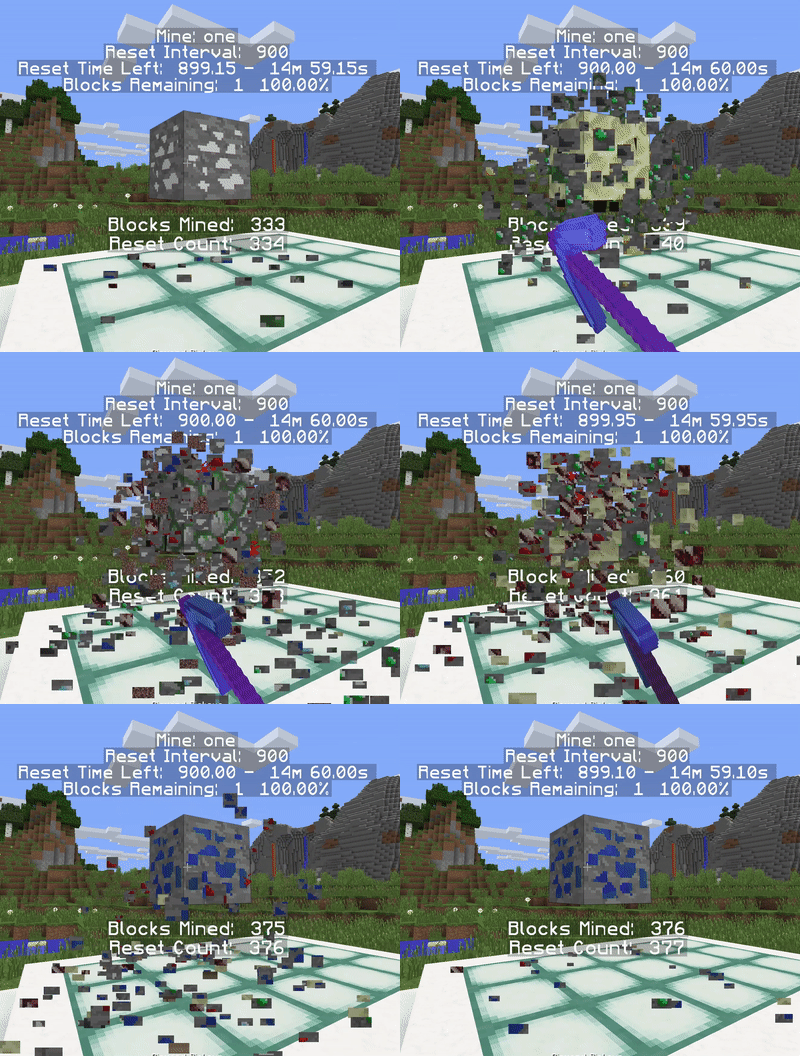
And that’s it for now. This is what I would consider a draft copy, and I will come back in a few days to refine this document (and remove this comment).